Showing posts with label Holidays. Show all posts

Monday, December 3, 2012

Christmas Countdown

To Celebrate the Christmas Season I thought it would be fun to do an Ornament Countdown.

I'll be sharing some of my favorite ornaments from my Christmas Tree.

Here are the pictures I've posted on my Facebook page thus far and you can see all of the ornaments that I've posted for the Month of December here on Instagram .

Day One

Day Two

Day Three

I hope you enjoy my COUNTDOWN to CHRISTMAS!!!

Wednesday, October 31, 2012

Happy Halloween


Be Safe trick or treating tonight with all of those little ghosts, witches, and vampires!


Wednesday, September 12, 2012

MONSTER Letters


Today I'm blogging about one of my new favorite creative places to visit, browse, and spend money at. The place is called The Wood Connection and it's a store filled with holiday projects of every kind along with all the supplies you need to make the many projects in their showroom. You will also find wooden frames of all sizes, plaques, blocks, ribbons, paints, tools, cut vinyl letters, sayings and also a variety of wooden letters. The hardest part is picking out just ONE project.

I recently finished making this set of MONSTER letters that I'm using for my Halloween decorating this year. I think my grandkids will really like them. I still have to purchase the three little monsters and I thought it would be fun to put their names on each of the three stands. 

Go HERE to see the 3 little wooden monsters I have yet to make.


Click HERE to see a few more of their Halloween Projects.

What I love most about their projects is that it takes a minimal amount of painting and all of the designs on each of the letters is done using scrapbook paper and then adding trim like ribbon, ric rac, buttons, and fur, just to name a few. On this project I also used heat set jewels on the letter T. You should be able to click on each of the pictures to get a closer look.


Go HERE to see their CRAFT TIPS on how to paint the blocks and apply the paper to the wood.


Go HERE to follow The Wood Connection on PINTEREST!


Right now The Wood Connection is only located in Utah but when I talked with the ladies at the store they were hoping to be able to ship items in the not too distant future. So, next time you find yourself in UTAH make sure to visit one of their three locations and give yourself at least an hour to browse and take it all in.


The Wood Connection is located at:

6680 South 300 West
Murray, UT 84107
801.265.2255

530 East State Street
American Fork, UT
801.763.9556

Furniture Store
372 West Winchester Street
Murray, UT
801.261.1013

Sunday, April 8, 2012

Happy Easter

On this most sacred day in which we celebrate the Life, the Atonement, and the Resurrection of Our Lord and Savior Jesus Christ I wanted to share this gift with you. It's a 7 minute video about the life and sacrifice of Jesus Christ. I know that he lived and died for each of us. I am filled with deep abiding gratitude for His Love, His Example, and His Atonement. May you each have joy and peace on this very special day.

Monday, December 26, 2011

I hope all of you had a very Merry Christmas!

The photo was taken by me and is a picture of an ornament that hung on my mother's tree for many years and now hangs on my tree. It's one of those cherished ornaments that reminds me of my mother and the many wonderful Christmas memories from my childhood.

May you have peace and joy in the New Year!

Sunday, November 20, 2011

Attitude of Gratitude


I've had this thought that's been constantly running through my head ever since I heard it. I'm sorry I can't remember exactly where I heard it or saw it but I do remember how it affected me.

"Blessings Come to Those that NOTICE!"

It caused me to be more mindful and reflective about my life and how blessed I feel to have a sweet and dear husband whom I love with a love that knows no end, a family that means everything to me, Children and Grandchildren who are priceless, Freedom that is a gift I cherish, a Faith that guides me, a Heavenly Father that Loves me, and a Savior that has Atoned for my sins.

I wanted to take a moment tonight to express my gratitude for each of you and for the blessings I see all around me. I have so much to be grateful for even when I feel overwhelmed by the challenges that are mine. Lately, I can't keep up with all that needs doing and I'm practicing patience and a positive attitude and trying to ignore the things that I can't get done at the moment I just want it done. I have little piles everywhere and I can't seem to take care of all of them. So, I have to remind myself. . . Just a pile at a time. It will eventually get done!

We recently had a little flood in the basement and that has set off a chain of events that requires a lot of cleaning, organizing, fixing, and painting. But out of that effort has come blessings. Like new carpet, new paint, and a fresh clean sewing/craft room.

We're still in a HUGE mess and it's just 2 days before my daughter comes home for Thanksgiving Break. I guess I better hurry and clear a space in her room since that's where I put everything from my sewing/craft room so we could paint and put in new flooring.

Anyway, I just wanted to check in and let you know that I'm still alive and doing well despite my little and big messes. I also, have some fun big news coming up that I'll be able to share the first part of December. I have been able to do a bit of sewing and designing this past fall while I wasn't blogging. I can't wait to share some of it with you.

Have a Wonderful and Blessed Thanksgiving Week with your LOVED ONES! I know I will.

Monday, April 25, 2011

Fluffy Stuffy Bunnies

Spring has been SLOWLY making it's way to Utah with varied kinds of weather from Snow to Rain to Sunshine and tonight we even had some Thunder! Hilarious, I know! I think we are definitely READY for some SUNNIER DAYS!

Anyway, the bunnies have been hippity hopping around the house and have been begging for a photo shoot. So, without further ado. . .

Here are a few of the bunnies I've been making for Springtime. . .


If you've fallen in love with the Fluffy Stuffy BUNNIES like I did. . . you can find the FREE Bunny pattern HERE and the FREE Bunny Dress Pattern HERE! They are so cute you will want to leave them out all year long.

This wonderful tutorial was created by the FAMOUS Jennie B. Harris of ALLSORTS. She is a very talented designer and artist with many credits to her name. Also, she recently designed an interactive children's book that you can download to your iPad. The information can be found on her blog HERE! You can also go to Apple's APP store and download the book. It's called "Bunnyfur's Easter Eggs" Go HERE to download it.

FYI: Just in case you're wondering. Yes. I did change the pattern slightly by adding bias binding to the neckline of the dress and left the top edges of the dress open for turning and then the raw edges are sewn into the binding.

I made the flower that you see clipped on the Bunny's ear using Felt and one of my favorite flower dies that I cut out using my Sizzix Die Cut Machine. I also made the covered buttons that screw onto a hair clip.

I almost forgot to tell you that I got the cute little plastic pots/cups at BIG LOTS for a $1.00 a piece. They looked like they could pass for little baskets to hold my Bunnies in and they came in lots of pretty colors. I also put candy in the eggs and wrapped the baskets in clear cellophane wrap that I tied at the top with a pretty bow.

Thursday, March 17, 2011

Leprechaun Traps

Did you miss me? I missed me too. lol. I will have to explain later but right now I want to say Happy St. Patrick's Day and share with you a few pictures I took today at school. The 1st graders have been working at home on their Leprechaun traps and yesterday they all brought them to school to see if they could catch a few of them during the night last night. They all came to school really excited to see if any of them had caught a Leprechaun. Some of the kids thought they had seen glimpses of Leprechauns during the week and a few kids even found a few notes in the classroom from the Leprechaun. It's been fun watching their excitement grow as we learned about Leprechauns these past couple weeks.

This first trap was made by the student I shadow. He told me that the Leprechaun climbed up the ladder to propose to the girl Leprechaun and when he stepped off the ladder he would fall into the trap. If you see the open area on top of the box, that's the viewing area where you can look in and see the Leprechaun. I thought it was a very clever trap and it made me smile and giggle as he told me how his trap worked. Very Cute!!


When the Leprechaun climbs up the ladder and stops off to get the gold he falls through the slit in the top of the hat. The slit is camouflaged by the gold coins.


I love how this one is decorated with a double rainbow and it's own little pot of gold that hides a trap door that drops him into the fake hillside below the pot.


The Leprechaun climbs the ladder even though there are warning signs telling him to stay off the ladder. lol. Of course, he falls in when he steps off the ladder.


Another trap door. Watch out!!!


This trap has a door that triggers shut when the Leprechaun steps over the threshold.


The lid of this trap falls on the Leprechaun and traps him inside the box.


When the Leprechaun reaches for the gold dangling from the string he falls into the pit. The other trap is camouflaged by glitter and gold strewn about the VERY sticky paper and traps the Leprechaun when he makes his move toward the pot of gold.


I love the instructions on the sign that says. . .
"Go up the ladder and you will see gold. Trust me. I NEVER LIE!!! lol.


Here is a sampling of the Green Treats that each of the kids brought to the St. Patrick's Day Celebration. Lots of sugar, some grapes, and there was even broccoli, although I don't see it on this particular plate, hehehe. I thought the apple juice was a great idea, too!!


I hope you enjoyed our little tribute to St. Patrick's Day.

Saturday, January 15, 2011

Valentine Banner

Do any of you remember the Blessings Banner I made at Thanksgiving time?

Well, the pattern is finally done!!!

This is my newest Moda Bake Shop Tutorial that's now available at Moda's Bake Shop. Click on this LINK to go to the tutorial and then you'll need to go to the end of the post where you see the "printer friend download icon" then click on the icon to be taken to the file where you can then print the pattern and the free tutorial. Go Check it OUT today!!

NOTE: The Moda tutorial banner pattern is set at landscape and the printer is printing in portrait so the pattern is too small. I've advised the Moda Editor and it will be fixed soon. Thanks for your patience.


These are the other variations I've made so far. . .

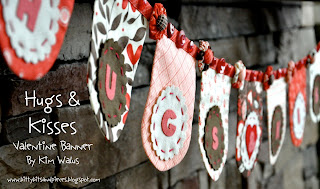
Hugs & Kisses Valentine Banner

Spring Time Banner
I will be teaching this banner variation at American Quilting's
Spring Quilt Retreat in March 2011

Thanksgiving Blessings Banner

Christmas Banner

For those YOYO lover's out there I made and attached 12 yoyo's in between each flag on the Valentine and Spring Time banners. They could also be added to the Blessings and Christmas banners too but I haven't done that yet. I also added extra embellishments to the Valentine banner. I love all sorts of buttons and had to add lots of red buttons in between the yoyo's.

I'm sorry this is a small picture but you can get any assortment or color or kind of buttons online at a place called MORE Buttons. If you live locally, I recently found them (again) at my American Fork Roberts Arts & Crafts Store.

Here's the LINK right to the red buttons. You can get to the More Buttons store by clicking on the link above.


Friday, November 26, 2010

Blessings Banner

Today, I am especially mindful of the abundant blessings I have in my life and the wonderful friends and family that have shared their lives with me. I want to thank my blogging friends, too. I really appreciate the time you take out of your busy lives to visit me here on my blog and for all of the kind words you leave in my comment box. Your comments are always appreciated.

Here's a little something I made yesterday. . . It's a Thanksgiving BANNER.

On Thanksgiving morning I woke up really early and all was quiet around the house. . . So. . . I quietly tiptoed downstairs to my sewing room hoping no one would find me for a few hours so I could focus on a few projects.

I was thinking, "What should I be working on today? I only have a short window of time before the final preparations begin. So, I better decide now and get working."


Well, as I was sitting there thinking I got side tracked from my multiple existing projects and decided to start a new project that's been brewing in the back of my head.

Here's the argument that went on in my head . . .

First off, I thought, "You've got to be crazy starting something new."

Then I thought,

"I can whip this out, it won't take long."

"You really need to do this, it's going to be really cute."


"But, I don't have time. . ."

"You can do this. . . you know you want to."


So, I got out my measuring tape and measured the mantel over my fire place and then pulled out my civil war prints and started picking out some of my favorite fabrics.


I decided on the word "Blessings" and figured out the math. You should've seen the frenzy. It's really satisfying for me to create something in my head and then create it. It's really a bonus to see that what you've made matches the vision in your head. It took me a total of 2.5 hours from thought to finish.


I will be posting a tutorial for this banner and the other one's I have floating around in my head sometime in the New Year. I will definitely let you know when I post it.

Wednesday, November 3, 2010

Halloween Apron Finish

I finished my apron a week before Halloween and it was so fun to wear at school. What an easy costume and so comfortable to wear. I really like this pattern and blogged about it HERE. If you go to this post you will find the information about the pattern and the apron bib which I changed. This particular apron bib is a 9" spider web block with a 1" finished border all around the block.

To make my apron I used Riley Blake's "Boo to You" collection by Mind's Eye for Riley Blake. You can see the whole fabric line HERE on Riley Blake's Website. If you hurry you may still be able to find some of this fabric online. It will probably be on sale too. I found some of it HERE and HERE and HERE. You may still be able to find some in your Local Quilt Shops too.

I almost forgot. I also used a Moda Bella Solid Black in the block and the border around the block too .


This apron is reversible which I really like.
Can you see the back fabric of the skirt?


Here's a closer look.


The day before Halloween my friend Candice (at work) wore this black spider ring made out of black beads. I had been looking for a spider and thinking about maybe having to make one when my eye saw this spider on Candice's hand. It was the perfect size and look that I wanted.


At lunchtime, I ran to the store where she got it and bought two of the last 3 spider's they had left. She thought they were gone and we started looking. I was so excited when we found a few hiding amongst the Halloween fare. The spider was the perfect finishing touch and the other spider ring I wore on my hand. So cool!!!

I hope you all had a great time giving out or collecting candy!!!

Tuesday, November 2, 2010

Costume Wrap Up

I finished Kenna's costume just in time for her Class Party. It took a lot longer to make than I projected because I got such a late start in the day. I finally sat down at my sewing machine at 10:30pm. I was already tired so I wasn't sewing very fast because I didn't want to have to unpick anything. I still made a mistake that didn't look like a mistake until it was finished and I thought "Oh Well, I don't even care. It's okay and no one will notice." and they didn't. I fell into bed at 3:30am and got up at 7:00am to get ready for work. It was a crazy night. I felt like a Zombie (Hi Monica!) the next day. lol.

Anyway, I'm just happy to mark that one off my list.

My current "To Do List" is quite LONG but, I'm ALWAYS juggling things around to suit my needs and to help others when called upon. But you know, I like it that way....


My sweet Dorothy from the Wizard of Oz.


What kid doesn't like donuts?


Hip Ruby Slippers.

Because Kenna wears a women's size 8 we couldn't find any sparkly glittery ruby slippers plus there was no time to make them nor did I want to deal with the mess so, we decided to buy cute red converse shoes that she could wear afterwards. They looked really cute on her.

Thursday, October 28, 2010

It's Called Procrastination

This is what I will be working on later today when I get home from work. There's nothing that causes more stress than Procrastination. lol. I was going to work on it yesterday but I was out buying a costume for Achievement days yesterday since I hadn't made Kenna's costume yet. lol. Oh well, I can only do what I can do and I have to be okay with that or I'll drive myself crazy. I have too many pots on the stove at one time.

I'm hoping someone understands my wonderful life. By the way...I'm NEVER BORED and I like it that way.


I will show pictures when I finish. Oh, I did get my halloween costume done. lol. I will take pictures of it later. I knew that if I didn't finish mine it probably wouldn't happen. I can deal with one last minute halloween costume but not two.

Have a great day!!! I better dry my hair and get to work.

Monday, October 18, 2010

Tini Treat Bags

Over the weekend I started the "Tini Treat Bags" that were designed by Monica Solorio-Snow from Happy Zombieland. You can find the pattern HERE.

I'm making these bags for some of my friends at work who have October birthdays and for some friends from church that I visit teach. I thought it would be fun to fill them up and spread some Halloween Cheer.

I've managed to cut out 12 bags and I've completed 5 bags with 7 bags to go. All 12 have been sewn together. I just have to sew the 4 corners and turn the bags right side out and then press them. It shouldn't take me more than an hour, I'm hoping anyway.

Finished Bag Size: 4" x 4" x 2"


This is another one of Monica's patterns that she did last year called "The Poochie Bag" and this is the LINK for the larger version. The smaller version (as seen in the picture above) is called "The Itty Bitty Poochie Bag" and you'll find it on the Moda Bakeshop HERE.

If you love bags here's a BAG that I designed for the Moda Bakeshop. It's big enough to hold a few charm packs or fat quarters and any other little goodies you may want to give to a friend for a birthday or special occasion. I love making, designing and giving little things to friends.

These are the 7 Tini Treat Bags that I have yet to complete.

After I finish the bags I will be starting on Kenna's Halloween Costume and working on the binding for my "Sneek Peak" quilt that I just picked up.