Friday, December 8, 2017

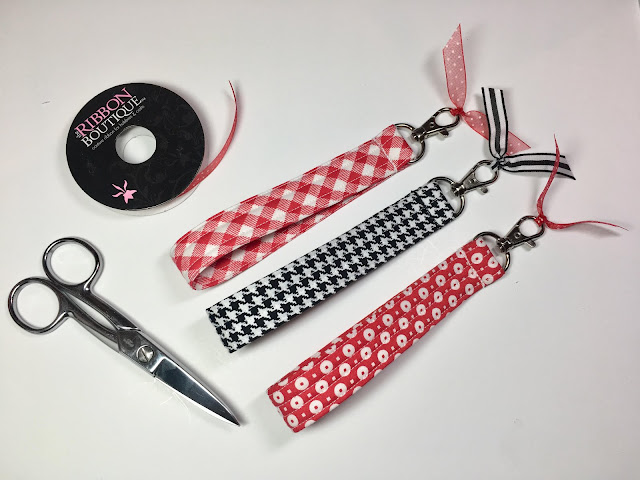
Kim's Key Keeper Tutorial


A few of my Instagram Friends saw a post I recently did on my Instagram account and several asked me for more information so I decided to put together a tutorial for my version of a Key Fob. It's been so very long since I've actually posted something on my blog but this is a great way to post tutorials for everyone to see and understand the steps and process in making things. I hope you enjoy this quick and easy tutorial. It's my GIFT to YOU this Christmas Season. 


Key Keeper Supplies:

  • Cut 1 piece of Pellon (One-sided) Fusible Flex Foam #FF78F1 measuring @ 3/4" x 12 1/2" 
  • Cut 1 piece of Fabric measuring 3" x 12 1/2"
  • 1 Swivel Lobster Claw Clasp Size 1 5/8" x 1" D Ring (inner width is 3/4")
  • Matching Thread for top stitching
  • 10 Binding Clips
  • Applique Glue
  • Zipper Foot


Swivel Lobster Claw Clasp Size 1 5/8" x 1" D-Ring
(inner width of D-Ring measures @ 3/4") 


Pellon (#FF78F1) One-Sided Fusible Flex Foam Scraps 

Key Keeper Instructions:


1. Start off with the 3" x 12.5" fabric strip
and the 3/4" x 12.5" foam strip.


2. Turn on your iron to set to High or Cotton making sure the Steam option is on. Then FUSE the adhesive side of the foam to the wrong side of the fabric along the long bottom edge of the 3" strip of fabric.


3. Fold the top edge over a 1/4" and press the
fabric along the top edge.


4. Take the bottom foam edge (foam is facing up before folding) and fold it over toward the middle of the wrong side of the fabric making sure the foam is wrapped snug inside. 


5. Bring up the top pressed edge and fold it down to meet the foam edge that you just folded over. The top pressed edge should match up with the folded foam edge (see above picture).
This will encase both raw edges inside.


6. Use the applique glue to adhere the two long edges together. Use the binding clips to keep it secure until the glue is dry. 


7. The glue takes less than a 1 minute to dry then remove clips.


8. Sew a narrow stitch on each long edge of the Key Keeper.


9. Then sew a 1/4" on each long edge of the Key Keeper.


10. Slip the short end of the fabric strip through the
opening in the D-Ring (see picture above).


11. Place both short ends of the fabric together
and sew a 1/2" seam.


12. Turn the inside toward the outside so that the sewn ends remain on the inside of the circle. Open the seam and place the straight side of the D-Ring inside the opened seam.


13. Pull the fabric of the Key Keeper up and around the metal. 
Then sew together using a 1/2" seam allowance.


14. Attach the zipper foot to your machine. Place your Key Keeper under the presser foot with the metal clasp located on the right of the zipper foot and the fabric loop on the opposite side of the zipper foot. Sew back and forth several times making sure to sew as closely as possible to the metal clasp to get a tight fit.


15. A 6" piece Ribbon can be added to the clasp if desired.  Tie the ribbon on and trim the ends.


The Key Keeper can easily be attached to your keys and makes it a lot quicker when you're digging through your purse to find your keys. You can even slip the Key Keeper around your wrist when you're out shopping or just going to the mail box to get your mail. I even clip my keys to my purse or belt loop.


I also use the Key Keeper as a handy strap on many of the bags and pouches I like to make for myself and others. Pictured above is my modified version of the Easy Sew Cosmetic Bag by So Sew Easy. Just incase you are wondering, I just made my bag longer).

You can find the link for the Easy Sew Cosmetic Bag- click HERE

I hope you find this tutorial useful. I've made over 200 of these Key Keepers over the last few years now and lots of friends tell me how much they love them and that's it's easier to keep track of them. 

If you want to follow me on instagram I can be found. . . 
@bittybitsandpieces

Just hit FOLLOW and I will get you connected.


Thanks for visiting my blog!!


Thursday, October 15, 2015

Bees Knees Quilting Bee • October 2015 Block

I've been participating in a quilting bee with some long time friends for the past year and we are starting another year of our Quilting Bee this month. It runs from October 2015 to October 2016. So keep an eye out for more blog posts. Several of the Quilters I've met in person and have known for many years and the others I have yet to meet in person but have know them through blogging and the quilting community. They are all amazing and talented women. You can check out our Blog at Bee's Knees Quilting Bee to see current and past blog posts. The Quilting Bee began in 2012.

This months block is for a sampler quilt that my friend Sherri McConnell has been working on for a few years and she decided to enlist our help in making 12 more blocks to add to her quilt. Each block that she mailed out has a different configuration so it will be fun to see her quilt when it's done. You will want to visit her blog at A Quilting Life to keep up with her. Sherri is very talented and currently has two books out called A Quilting Life: Creating a Handmade Home and Fresh Family Traditions. Sherri along with her daughter recently designed a new fabric line for Moda Fabrics called Bright Sun. The fabric collections is expected to ship to quilt stores in November 2015.


I had a lot of fun looking through my Bonnie and Camille fabrics to add to the fabrics that Sherri sent me. I think I'm going to have to eventually get it together and make a sampler quilt using what Bonnie and Camille fabric I've collected over the years. It's a shame that it's just been hiding in drawers and stashed on shelves. It's such great fabric.

Here's a picture of the the Quilt BLOCK sewn up in the pattern layout that Sherri sent to me. I can't wait to see the blocks everyone else has sewn.


 I made a blog post!! Are you surprised? I assure you that I'm still alive and well.

Have a great week my longtime blogging friends!!

Thursday, January 10, 2013

2013 Pincushion Club

Ok...okay...before I get started I have to admit that I am horrible at blogging ever since Google Reader, Facebook, Flickr,  Pinterest and Instagram have entered my life. I just don't have enough time to do justice to everything but, stick with me, I will keep trying to blog when I find a moment and have a picture or two to share. So. . . on to the fun stuff. . .

BIG ANNOUNCEMENT!!!

I'm announcing here on my BLOG that I will be teaching a monthly Pincushion Class at JUST SEW. So, if you live close by you may be interested in checking it out. You don't have to commit to a whole year but you can sign up for the pincushions you're interested in making.

Here are the details:
  • Where: Just Sew located in Highland, Utah
  • Date: 3rd Saturday of each Month
  • Time: 9:00 a.m.

Class sizes will be limited to 10 people due to limited classroom space. 

Here's a preview of some of the pincushions we'll me making:

2013 Pincushion Club
January's Pincushion

A closer look.

First 3 months of Pincushions.
2013 Pincushion Club at Just Sew.


One More Look!

I love all of the pincushion inspiration you can see on my pinterest pincushion board. I have so many ideas and love creating things. Here's a little look ahead at what I'm working on for the month of May. I love flowers and I love Mother's Day so what better way to pay tribute to my MOM than making a Potted Flower Pincushion!

Just a little note: If you don't know. . . I love itty bitty things and always have. . . So. . . when I had this design running through my head I knew it had to be on the itty bitty side of things. It stands just 4.5" tall from the base of the pot to the top of the flower. It turned out just how I saw it in my head!

I'm also playing around with making one a bit bigger, not much, but a bitty bit bigger!


Well, it's late now and I must start to wind down and go to bed early. I've been keeping too many late late nights all in a row. It just makes it really hard to get moving in the morning. **tired sigh**

Here's a belated Happy New Year to EVERYONE!!! Thanks for all of your talents, inspiration, creativity, and commitment to the craft of sewing, quilting, crocheting, knitting, and creating!!! You all make such wonderful projects. I could spend more hours than I have being inspired by what EACH of YOU CREATE!!!!

Also, I want you to know that I'm still alive and well. My blogging will just have to continue to be sporadic until I retire from working full-time but, I hope you will check in on occasion and leave a comment so I know you were here. I miss hearing from so many of YOU. . . my Quilting Friends.

Monday, December 3, 2012

Christmas Countdown

To Celebrate the Christmas Season I thought it would be fun to do an Ornament Countdown.

I'll be sharing some of my favorite ornaments from my Christmas Tree.

Here are the pictures I've posted on my Facebook page thus far and you can see all of the ornaments that I've posted for the Month of December here on Instagram .

Day One

Day Two

Day Three

I hope you enjoy my COUNTDOWN to CHRISTMAS!!!

Wednesday, October 31, 2012

Happy Halloween


Be Safe trick or treating tonight with all of those little ghosts, witches, and vampires!


Tuesday, October 23, 2012

Book Cover Reveal


I can finally show you the picture of my daughter's book cover. It's very eye catching and we love it! Also, I can announce that her book sold to Hot Key Books in the UK and will be coming out the same day as the U.S. on May 21st 2013. 

The Back Cover Copy: 
Plenty of teenagers feel invisible. Fiona McClean actually is.

An invisible girl is a priceless weapon. Fiona's own father has been forcing her to do his dirty work for years—everything from spying on people to stealing cars to breaking into bank vaults.

After sixteen years, Fiona's had enough. She and her mother flee to a small town, and for the first time in her life, Fiona feels like a normal life is within reach. But Fiona's father isn't giving up that easily. 

Of course, he should know better than anyone: never underestimate an invisible girl.

The Blurb:
“Debut author Natalie Whipple deftly explores painfully real teen experience through delightfully unreal stories. Transparent is a smart, funny, tense gem of a book, and Fiona claims a spot as one of my favorite heroines.” Kiersten White, New York Times bestselling author of the Paranormalcy trilogy 

Pre-Orders are available on Amazon

Thanks for your interest! Have a GREAT day!

Friday, October 12, 2012

Crazy Excited!!!

I wanted to take a few minutes today and share some great news with all of my friends. . .

First...

We are all CRAZY EXCITED around our house with BIG NEWS that you can now PRE-ORDER my daughter's book on AMAZON. You can also check out the news on my daughter's recent BLOG post if you're interested.

Second. . .

The BIG Cover REVEAL will happen in about 10 days!!! I've seen it and it's so awesome!!! I will make sure to share it with you when I can.

Just in case you don't know. . .

I've shared a few things in the past about my daughter becoming an author and today we are excited. When TRANSPARENT (her book) comes out on May 21, 2013 it will have been TWO long years since she signed the contract with Harper Teen (Harper Collins) not to mention how long it took before that to acquire a literary agent.   

The time has finally come to start seeing her dream becoming a reality.

Quilting Comparison. . .

There is more effort in making a book come to life than I could ever have realized. I've learned this in watching my daughter go through the publication process and it's not an easy thing to do!

I believe that's why doing hard things and then following through until we've reached our goal or task gives us such a deep sense of satisfaction and meaning in our lives.

Quilts, especially quilts that require a lot of time, become heirlooms!! Whenever I see Baltimore Quilts, or Quilts with a gazillion pieces I think of how much time and effort and expertise that went into creating such a beautiful piece of art. I love quilting and hope that someday my quilts will be heirlooms to my children and their children.

I just LOVE QUILTING and CREATING!!!

Have a WONDERFUL weekend and take some time to SEW!!!

P.S. I'd love it if you would take the time to go to the Amazon link and click the LIKE button. Thanks for your help in generating excitement about the book!