Friday, January 30, 2009

Author: Jan Brett

Being in School this year I've gained a greater appreciation for READING. I love to read and last year I read over 30 books and hope to break that record this year. I want my youngest child to see me read more than my older children did. I was too busy being a mother of 3 young children and taking care of my two nephews. I didn't read very much then. But, I'm taking the time now to do it and I LOVE IT!!!

Thanks too, Natalie, for your inspiration and example!!! She's my biggest reader and now is aspiring to publish her own books. She's written 6 novels this past year and hopes to acquire a literary agent this year. We have great hopes for Natalie's success!!! I've loved every book she's written!!!

Each month in school we have an Author of the Month and this month it's been Jan Brett. She is a remarkable artist and studies her subjects first hand as she travels to places like Europe, Africa, China, and Costa Rica just to name a few.


This is a drawing of "Hedgie" the Hedgehog that I finished in class today. Our class watched Jan Brett's video "How to Draw a Hedgehog" and it was fun to see the kids get excited about learning to draw a hedgehog from such a talented artist. Her videos are fun to watch too!

Her Website is filled with lots of things to see and do. It's well worth your time, especially if you have children. You can make post cards, watch videos of how to draw Hedgehogs (see my hedgie above), chickens, elephants, lions, etc. You can also view her library of videos and watch her adventures in illustrating and writing her books. It's really quite fun!!!

Click on the links below to go to the different activities:
Send an email postcard here.
Print coloring pages here.
Print your own bookmarks here.
Print your own cards and envelopes here.
How to draw videos are here.

All About Jan Brett:

With over thirty four million books in print, Jan Brett is one of the nation's foremost author illustrators of children's books. Jan lives in a seacoast town in Massachusetts, close to where she grew up. During the summer her family moves to a home in the Berkshire Hills of Massachusetts.
As a child, Jan Brett decided to be an illustrator and spent many hours reading and drawing. She says, "I remember the special quiet of rainy days when I felt that I could enter the pages of my beautiful picture books. Now I try to recreate that feeling of believing that the imaginary place I'm drawing really exists. The detail in my work helps to convince me, and I hope others as well, that such places might be real." As a student at the Boston Museum School, she spent hours in the Museum of Fine Arts. "It was overwhelming to see the room-size landscapes and towering stone sculptures, and then moments later to refocus on delicately embroidered kimonos and ancient porcelain," she says. "I'm delighted and surprised when fragments of these beautiful images come back to me in my painting."
Travel is also a constant inspiration. Together with her husband, Joe Hearne, who is a member of the Boston Symphony Orchestra, Jan visits many different countries where she researches the architecture and costumes that appear in her work. "From cave paintings to Norwegian sleighs, to Japanese gardens, I study the traditions of the many countries I visit and use them as a starting point for my children's books."


Here's a list of the Books she's written over the years:
Books Written and Illustrated by Jan Brett
(Click on the links for more information)
GINGERBREAD FRIENDS--G.P. Putnam's Sons
HEDGIE BLASTS OFF!--G.P. Putnam's Sons--2006
THE UMBRELLA--G.P. Putnam's Sons--2004
DAISY COMES HOME--G.P. Putnam's Sons--2002
CHRISTMAS TREASURY--G.P. Putnam's Sons--2001
HEDGIE'S SURPRISE
--G.P. Putnam's Sons--2000
THE HAT
--G.P. Putnam's Sons--1997
COMET'S NINE LIVES--G.P. Putnam's Sons--1996
ARMADILLO RODEO--G.P. Putnam's Sons--1995
CHRISTMAS TROLLS--G P. Putnam's Sons--1993
TROUBLE WITH TROLLS--G. P. Putnam's Sons--1992
BERLIOZ THE BEAR--G P. Putnam's Sons--1991
THE WILD CHRISTMAS REINDEER--G P. Putnam's Sons--1990
THE FIRST DOG--Harcourt Brace Jovanovich--1988
ANNIE AND THE WILD ANIMALS--Houghton Mifflin--1985
FRITZ AND THE BEAUTIFUL HORSES--Houghton Mifflin--1981

Books Retold and Illustrated by Jan Brett
THE THREE SNOW BEARS--G.P. Putnam's Sons--2007
HONEY...HONEY...LION!--G.P. Putnam's Sons--2005
ON NOAH'S ARK--G.P. Putnam's Sons--2003
WHO'S THAT KNOCKING ON CHRISTMAS EVE--G.P. Putnam's Sons--2002
GINGERBREAD BABY--G. P. Putnam's Sons--1999
TOWN MOUSE, COUNTRY MOUSE
--G. P. Putnam's Sons--1994
THE MITTEN--G. P. Putnam's Sons--1989
BEAUTY AND THE BEAST--Clarion--1989
GOLDILOCKS AND THE THREE BEARS--G. P. Putnam's Sons--1987

Books Illustrated by Jan Brett
THE NIGHT BEFORE CHRISTMAS --G.P. Putnam's Sons--1998
THE OWL AND THE PUSSYCAT--G. P. Putnam's Sons--1991
HAPPY BIRTHDAY DEAR DUCK--Clarion--1988
THE TWELVE DAYS OF CHRISTMAS--G.P. Putnam's Sons--1986
SCARY, SCARY HALLOWEEN--Clarion--1986
MOTHER'S DAY MICE--Clarion--1986
NOELLE OF THE NUTCRACKER--Houghton Mifflin--1986
VALENTINE BEARS--Clarion--1983
ST. PATRICK'S DAY IN THE MORNING--Clarion--1980


Thursday, January 29, 2009

A Little Bit of Inspiration

This past Tuesday night was our quilt group. We always have show and tell and it's always inspirational. I thought I'd share some of the quilts that inspired me. I'm sorry about all of the heads as I was in the back row and couldn't avoid them. If you want to see the first half of the show and tell you can go to Nanette's blog at Freda's Hive (I was a few minutes late).

This had to be one of my favorites that night.

Pinwheel Quilt

I'm pretty sure this is a Buggy Barn Pattern too. Love the flags!!!

Look at this awesome binding. I love how it's been notched and the corners cut at an angle. Great Job Sharon. This is a buggy barn pattern.

Love the rich colors.

According to Paula she started this quilt nearly 20 years ago.

Love the crows and the TURKEY!

Click on the picture to see this darling I Spy Quilt.
It has realistic magnifying glasses.
They were made with a gold bias tape.

Look at that unique border fabric.
I don't think I've ever seen anything like it.

Really Gorgeous Log Cabin Quilt by Gail.

I love this scrappy quilt.

This Americana Quilt is just beautiful.
I'm sorry I didn't catch who designed it.
I'd like to know too if anyone knows.

This is a beautiful applique quilt.

The quilt on the left is the wall hanging that goes with the quilt.
Helen is a fantastic quilter and machine quilts on her Bernina.

I love this bright and happy floral applique quilt.

Chocolate Bunnies

American Jane Pattern

Wednesday, January 28, 2009

I Need Your Help. . .

I've been quite AMAZED and OVERWHELMED by your show of BLOGGY LOVE and your SUPPORT of my 100 post giveaway, but frankly, I'm surprised that it's been so successful. I was being optimistic when I thought, Oh, maybe I'll get 100 commments, I can handle that. . . I had no idea that this would take off this way.

THANK YOU SO MUCH!!!

But,

I NEED your HELP and SYMPATHY on this one. . .

I'm soooo0 sorry but I'm going to have to END the giveaway a little bit early. I just can't keep up with all of you and I've read and read and read and visited 100's of blogs, and tallied over a 190 entries and I have over 160 more emails to go through and more arriving in my inbox as we speak.

So, I've decided to END the giveaway at "400 Comments" and then that will give me a couple of days to finish reading, tallying the comments, and preparing for the drawing on Sunday. So, if you know anyone that is dying to have their name thrown in the hat, please let them know to come by quickly and leave a comment.

I appreciate all of the new readers of my blog and I hope to be able to inspire and to share my love of all things creative. You truly have added so much to my life. Thanks again!

Keep Sewing and Creating!!

Tuesday, January 27, 2009

Giveaway Update!

WOW!!! WOW!!! WOW!!! You Quilter's are AMAZING!!!

I never quite expected this kind of wonderfully, overwhelmingly, generous kind of RESPONSE!!!

Thank You, Thank You, Thank You, to EVERYONE from all over the world. I've checked out over 137 blogs and have about a 100 more emails to go through. I'm having a hard time keeping up with it but, will get it all done before Sunday. I'm sure I may have a few more comments over the next few days as the giveaway comes to a close so, I will keep you all updated.

Remember, even if you don't win you can check out the tutorial on Suzie's blog and make as many as you'd like. They are really fun and make up pretty quickly. I'm actually making about 15 for friends at work but, they will just get Valentine treats, no fabric for them. LOL!

I'm glad you've all enjoyed this giveaway and I've loved reading everyone's comments. It's made me feel all warm and fuzzy inside!! Thanks again Everyone for your support!!!

Sunday, January 25, 2009

100th Post Giveaway!

I'm
"Spreading the Love"

for my
100th Post Giveaway!!

I've decided to giveaway
TWO prizes in celebration of this special day! Keep scrolling down to see the prizes.


Prize #1
(everything in the picture above including Chocolate!)

One is a cute Valentine Mini Purse filled with 100 bitty bits & pieces of Valentine Fabric from the Sandy Gervais collection called "Hearts A Flutter." It came out two collections ago in 2007 if I remember correctly. It's been one of my favorite Valentine Collections especially since it has so much variety.


The purse will contain 4 squares each of 25 different prints in red, pink, and cream for a total of 100 squares in celebration of my 100 bloggy posts!

Hey, It's a "Mini" Charm Pack!
The squares are cut @ 2 1/2"x2 1/2"
and tied with a ribbon.

Close-up of the bitty bits & pieces of fabric in the mini purse.


The second prize is one of the Love Note Pillows as seen in a previous blog. When this collection came out a few years ago I loved it so much I bought a 1/2 yard of every piece in the collection. It called my name the minute I walked in the quilt store and saw it. Some fabric just speaks to me . . . BUY ME and take ME HOME!!!

Prize #2
Love Note Pillow with Valentine Card.

Please Note: Many thanks go to Suzie @ littlebusybee.blogspot.com for the mini purse idea. I loved the idea!!! I just LOVE small things, always have, always will! She has put together a great tutorial on how to make them. You can find the tutorial here. It will take you right to the post but you'll have to scroll down a bit before you'll see it.

These are my version of Suzie's Mini Purses.

Help me celebrate this milestone by leaving a comment and spreading the love. I'm trying to break my comment record of 19 comments (you all helped me break my record yesterday with the pre-giveaway hype) and I need your help to do it again, many thanks!
  • Leave a comment and I will put your name in ONE time.
  • Blog about it on your blog and I will put your name in FIVE additional times.
  • Have your friends tell me you sent them and your name goes in another FIVE times.
Please email me at kimberlywalus (at) mac (dot) com and let me know that you've blogged about it on your blog so I can make sure to add your entries into the drawing.

If you could help me save time looking for your email addresses that would be great. Just add your email to your comment and then I can get back with you. Thanks!

I'll pick two winners on February 1st at 10am and will mail the prizes off the next day so it arrives before Valentine's Day. Good Luck Everyone!

Saturday, January 24, 2009

Any Guesses?

Any guesses on what kind of GIVEAWAY I'm planning?


Here's a hint: I'm approaching my _____ _____!


Don't you just LOVE this fabric?

Well, I used it to make something very special for my "Spread the Love" giveaway.

The person who guesses the right answer FIRST will have their name added to the upcoming drawing 5 times. When I make my big _____ _____ you will also be able to leave a comment on that post to have your name added 1 time to the drawing. More details coming soon!

Keep your Eyes open for the big _____ _____!

Friday, January 23, 2009

Favorite Tools

I just wanted to share some of my favorite tools with you. Hope you enjoy this post.

I recently found these great pots at Target in their home decorating section. They're RED too!! Woohoo! I love RED! They are the perfect size and with it's big opening everything is easy to access. Love it! I bought two for me and one for a friend. You might also notice the scissor pull that's made out of fimo clay. It's a really cute miniature quilt block. It's amazing what talented fimo artists can make with clay.

I love this seam ripper. I bought it a few years ago but, I can't seem to locate the same one online. You can buy a Fons and Porter version here or at your local JoAnn's. It works really nicely in cutting your chained pieces of fabric. I use this tool quite often and I'd have to buy another one if it broke or I lost it somewhere.

Here's the Fons and Porter version.

Now this is a really really really handy cool tool. It presses open your seams when you're paper piecing or just need to do a quickie press. The wooden circle rolls across your seams and it's got a really cute handmade handle. I bought it from a gentleman at the HMQS show. He also makes matching seam rippers. I'll have to buy one of the seam rippers at the next HMQS show that's coming in May, I think! I have his phone number if any of you are interested. I don't think he has a website or anything like that. Just let me know and I'll email it to you.


This is one of my favorite and most used scrapbooking tools.

It's a Scotch ATG 700 Tape Gun. The tape rolls come with 36 yards of 1/2" double-sided adhesive transfer tape. When I first saw this tape gun I was so excited as I added up the amount of "Tombo" tape guns I would have to use to add up to the 36 yards of tape used in just one roll of tape.

In the scrapbook store the gun alone cost $70 but I knew that I could find it cheaper on the internet and sure enough I got it for $35.95. The tape rolls were $11 each at the scrapbook store and I got a case of 12 rolls for $46.44 that's just $3.87 a roll and if you divide that number by 36 yards, that's just over .10 cents a yard. Hard to believe the savings. It's been a great investment.

I bought it from A-PAK Manufacturing Inc. about a year and a half ago. I just checked and it's gone up to $41.60 for the tape gun. That's not too bad of an increase over time.

Thursday, January 22, 2009

Plastic Boxes & Containers

I have an obsession with plastic boxes and containers.

Must BUY MORE!!! I NEED MORE. . . plastic boxes!!!

My husband gives me a hard time every time I come home with them (IF?, that's right! IF, he sees them, ha ha!). These sweet little boxes were EASY to get in the house and they work for so many little things you find in your sewing/crafting room! I bought them at TAP Plastic when I was visiting friends in California this past August. There are lots of little treasures on their website. I've mentioned just a few below.

I've used these 3 boxes to keep my snaps & tools in.

I googled their company for you and sure enough they have a website and you can buy them here. I was excited about that because I need a few more. LOL! These might be harder to sneak in since DH works at home and they would be delivered to our home. LOL! Anyway, here they are.

Several sizes to choose from:
B. Style FT-2: 0.76"L x 0.62"W x 1.69"H
C. Style FT-19: 1.60"L x 1.39"W x 2.53"H
D. Style FT-42: 2.13"L x 2.13"W x 2.63"H
E. Style FT-38: 3.70"L x 2.73"W x 1.16"H (good size, I need more of these)
F. Style FT-33: 2.72"L x 2.72"W x 1.34"H
(good size, I need more of these)
G. Style FT-104: 4.02"L x 1.51"W x 4.63"H
Style FT-4: 1.13"L x 0.69"W x 1.65"H (not shown)
Style FT-9: 1.60"L x 0.69"W x 2.53"H (not shown)

LOOK. . . at these Candy Bins?! What cute gifts they would make! I might have to add these to my order for Valentine's Day!

The boxes below I bought at a place here in Utah called "Xpedex" located in Orem. You can buy the bigger ones for under $3.00 and most places sell them for over $5.00. Hence, I have about 15 or more of them. You giggle and ask why? Well, it's because I have so many projects and projects waiting to be placed in a box. **smiles half ashamedly** Anyway, they are great boxes to carry and organize your projects in.

These plastic boxes fit 12"x12" scrapbook paper and are perfect for organizing my quilting projects. I have 10 of them stacked under my sewing table and a more can be found in a few other places. They also come in an 8 1/2" x 11" size.

These great plastic trays I got from Bed Bath & Beyond. I keep them by the side of my sewing machine and it holds all of the things I use frequently like my scissors, thread, bobbins, needles, presser feet, seam ripper, and a scratch pad for notes, etc.

I have lots of other plastic containers and plastic drawers full of stamps, paper, scrapbooking stuff and of course, fabric.

Hope you enjoyed this plastickie post.

Wednesday, January 21, 2009

Organized Chaos!

Do you like to organize? I do, but I often feel like I live in CHAOS too.

I have affectionately called it ORGANIZED CHAOS!!!

You may ask. . .What does that mean?

Well, let me explain. . .

I love to organize but have too much fabric, too many tools, too much paper, too many stamps, and NOT ENOUGH ROOM or space to put it all in. I need one of those really cool craft rooms that I've seen around blogland. I'm not saying mine isn't cool, I'm just happy to have a space to call my own. It's a spare bedroom with an inadequate size closet crammed full of stuff that's not easy to get too when I want something. Hence, the chaos occurs when I start digging to find something I know I have. Do you have the same problem?

I've been an artist/crafter/painter/scrapbooker/stamper/seamtress and quilter for 30+ years (basically all my life). So I have a lot of stuff I don't want to part with. Anyway, I'm rambling. My point is. . . I wanted to share some of my organizational efforts.


This is a great idea to utilize the space behind a door. I use it for my quilting and sewing things along with some of my scrapbooking and cardmaking things.

I forgot to mention it's a cheap over the door hanging shoe holder. Just in case you were wondering.

Sunday, January 18, 2009

Love Notes Tutorial

Well, here it is, as promised! I'm really sorry it's taken me so long but, I like to take detailed pictures for my tutorials and therefore it takes me a bit of time to orchestrate and finish. I hope you enjoy my efforts!

Love Note Pillow
by Kimbery Walus

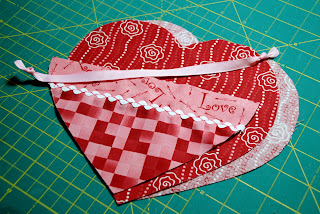
Just a few details before you begin. The heart can be made into any size you choose. The one pictured is 8 inches across at it's widest point and 6 inches from the "V" at the top of the heart to the point at the bottom. I just took a regular 8 1/2" x 11" piece of white paper and folded it in half lengthwise. Then I just cut out a heart. You can make your heart long and slender or shorter and wider. The process will remain the same just the measurements will be different.

I've also included hearts I made for each one of my kids out of decorator fabrics. The pillows work just like a "Valentine Card Mailbox" and can be hung on a chair, a doorknob, a bedpost, or tied to your stair banister. You will also see a Valentine Card I made today to show you how it works. Just stick your "Love Notes" in the pocket of the heart pillow. The smaller hearts I made for friends and family.

My Valentine "Love Note" slips into the pocket of the pillow.

Here's a closer look!

Here's what you'll need to make the Love Note Pillow.
  • Cut 2 hearts out of a red fabric.
  • Cut 1 piece of fabric for for the pocket (it's approximately 3 inches up from point of heart).
  • Cut 1 pocket border strip @ 2 1/2" by width of heart (cut just a little bigger and trim excess after sewing it on the pocket making sure to follow the curve of the heart).
  • Cut One 12" piece of grosgrain ribbon to hang the pillow.
  • Cut One 9" piece of white Ric-Rac (or more if you make your pillow bigger).
  • 3 Strands of Pink or Red Embroidery Floss to sew on the Ric-Rac.
Make sure to sew on the pocket to the right side of one of the hearts. Secure top edges of the pocket by back tacking. Tie knots in the ribbon and back tack in place.

Make sure the ribbon is evenly spaced before continuing.

With right sides together put the two hearts together.

Using a 1/4" seam allowance sew around the heart starting just before the point and finish leaving enough room to turn right side out. A three finger measurement should be ample. Also, make sure to sew over the ribbons a back and forth to give it extra strength. The same goes for the edges of the pocket.

Before turning the pillow right side out make sure to clip your points and curves then turn and press the heart.

Lightly stuff the heart making sure not to over-stuff. You'll want enough give in the pocket area to put a "Love Note" and a Valentine treat or two inside for that special someone.

Here are a few pictures of the larger ones I made for my family. I used decorator fabric, tassels, cording, braided trim, ribbons, and a metal scrapbook buckle (by Creating Memories) at the center of the bows.


I've hung two of the pillows on the sconces in my dining room. They look really cute there and I may have to leave them there permanently. My husband didn't seem to mind having them hang there. He's become more of a neat freak as he's gotten older too so extra clutter doesn't stay around very long. We finally got the last of the Christmas things put away after work on Friday. It felt so good to have it done and that's why I had all day to work on this tutorial. I enjoyed sewing, organizing, making Valentine Cards, and working on a few other projects, too!!!

Have a great Sunday and holiday on Monday. I'm hoping to sew on Monday too!!!