Just to let you all know. I'm off to a quilt retreat for the next three days. I will try to take lots of pictures of all the happenings. My only commitments are teaching two classes and doing a trunk show one night. I'm also making the mystery quilt. It will be fun to see it as we make it.
It's been a little crazy at home getting everything ready to go and I'm sure I've forgotten something. But, Oh well!
Have a great rest of the week and I'll try to get some things posted this weekend. So check back!

Wednesday, February 25, 2009
Saturday, February 21, 2009
Bit of a TASK!!
This is how I spent the majority of my Saturday. . .
 Sewing and . . .SEWING. . .
 . . .and SEWING!!
After a 10 hour day sewing my back is killing me!!! I don't usually have that kind of time to sit and sew but, today I needed to work on finishing my task of making the bitty purses for a big event coming up.
I didn't quite finish all of them but I did make 64 of the 80 bitty purses along with the cute tags that are tied to the handles. I was really excited that the tags even coordinated and felt pretty lucky that I had paper to match.
Here's a few pictures of the tags. . .
 These tags were so fun to make.
 I used a 2" scalloped circle punch to make the tag and a flower punch by Quikutz for the flower. I also used a flower stamp by "Stampin-Up" and the words are from a stamp set by "Hero Arts." The tags are tied to the handle using a 6" piece of 1/4" ribbon.
I hope the pictures inspire you to make some bitty purses of your own. I plan on making more for Mother's Day and filling them with goodies and maybe even some earrings to give to the special Mother's in my life. I have quite a few women who have blessed my life!
Here are the purses grouped in their respective colors. In some of the pictures you will notice that the lining became the outside and the outside became the lining. The purses are actually reversible which is really fun. When the lining fabric was more plain I left it inside.
 Purple-Yellow Group
 Blue-Red Group
 Black-Yellow Group
 Blue-Green Group
 Blue-Pink Group
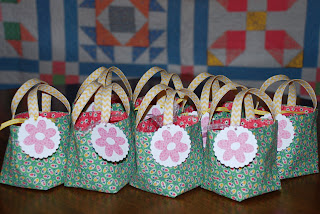 Green-Pink Group
 Black-Pink Group
 Blue-Red Group
 I'm hoping there's a favorite color for everyone!
I'm still working on two groupings.
One Orange-Yellow and another Blue-Pink
Well, I've taken some Advil and I'm headed off to bed. I plan on sleeping in until 9am if I can.
Goodnight. . .and Sweet Dreams!!!
Please Note:
For those that missed the tutorial link in my 100th post here it is! I will also be posting it on my sidebar for those that may want to always know where it is. Check back soon. I think I'll be adding a few quick tips to Suzie's tutorial that I learned while making over 64 bags. Have fun making these fun little purses. Just so you know I've been talking with Suzie through email and it was fun to learn that she made up the mini purse. Isn't it sooooo cute? I just LOVE it and lots of other's have too! Bravo Suzie!!
Make sure to leave some COMMENT LOVE for SUZIE when you go by for a visit. Thanks!! Oh and BTW the bags are for a quilt retreat. Shhh! Don't tell anyone, it's kind of a surprise. I'm hoping that none of the ladies read my blog, yet! LOL!
Tuesday, February 17, 2009
Dresden Plate Tutorial
This is my new favorite quilt block. It's called a Dresden Plate. Don't you just love the SCRAPPINESS of it? It just makes me HAPPY to look at it and touch all of those wonderful fabrics. My friend Rae Ann and I are making a lot more than one block but, we haven't decided how many quite yet, but maybe 100 blocks for a king-size quilt. We'll see how ambitious we are as we start cutting fabric. Between the both of us we could probably do it with not too many repeats.
Some of my friends and I are taking a Block of the Month Class at American Quilting and each year for the past 5 years Amy (the owner and resident designer) has designed and taught her Block of the Month Quilt. In past years we have done a Winter, Spring, Summer, and Fall Quilt and this year it's a Patriotic theme. The patterns for Amy's (past years) BOM Quilts can be purchased on her website "Under the Garden Moon" she also has more great patterns that she and her daughter have created. Make sure to check them out, you won't be sorry that you took the time to visit.
I'll keep you updated on our progress but, in the mean time I thought I'd get you all started with where to buy your ruler and a little tutorial to show you how to make the block. . . just in case you want to make a Dresden Plate Quilt along with us.
The ruler can be purchased from Connecting Threads or you can go into American Quilting and buy one if you live in or near Orem, Utah. The Dresden plate block as seen below was the BOM for January.
 This is the Dresden Plate Block.
The block will finish at 9 inches square when sewn into a quilt.
 This is the 18 degree fan ruler that also comes with a pattern.
Tutorial for Making a Dresden Plate Block
Begin by looking through your fabric. You will need a variety of fabrics in an assortment of colors and patterns. One thing you'll want to remember is the fabric you pick for the Dresden Plate wedges should be a good contrast to what you pick for the background fabric. In other words, you can use any variety of light to dark fabrics just remember you don't want your light fabric to blend in with the background or it will look like you have missing wedges. What a great way to use up what you have laying around the house.
Next, you'll want to decide on a background fabric and purchase what you might need. You will get four 10"x10" squares out of every 10 inch cut of fabric (a generous 1/4 yd. cut).
 You'll need 20 rectangles for each Dresden Plate.
Each rectangle measures 2 1/4" x 3 3/4"
 Line up the ruler as shown above.
 Trim off both sides to create a wedge or spoke in a wheel. Take a single wedge, fold the wider edges with right sides together, and sew using a 1/4" seam making sure to leave a long tail in between the wedges (that way your stitches won't unravel). Now pick up another wedge repeating the process, continue chain-stitching until you've completed 20 wedges. Cut your chain apart. Trim the seam at the tip, press seam open and fold to the back (wrong sides to wrong sides). Center the seam and press.
 Here are all the spokes ready to be sewn into a Dresden Plate block.
 You can arrange the spokes in a pleasing manner or randomly pick them up. You can sew them into sets of pairs or sew them one by one like I did.
IMPORTANT: Make sure to leave long tails so they can be tucked under the seams in the back of the block. Continue sewing until you've sewn all 20 spokes together. Then sew the last seam to connect the wedges into a circle.
Please note: If you sew narrow (scant 1/4") seams you will end up with a bigger Dresden Plate. If you sew larger (fat 1/4") seams you will end up with a much smaller Dresden Plate. Which ever way you sew will determine how big of a center circle you will need to cover the opening and finish the block. Big or small be consistent!!
 The seams between each spoke can be pressed open or pressed in one direction. I personally liked the spokes pressed in one direction it gave it a sense of movement and dimension. The seams pressed open will make it lay very flat but it creates a depression in between the seams. Both will work it's just a matter of preference.
 Here's a look at the pressed seams in the back.
 My handy dandy pressing tool was very useful. It saved me a lot of trips to the ironing board and is very effective in pressing the seams open without any distortion.
 Here's the back of the completed Dresden Plate.
 Here's the front of the Dresden Plate.
 I cut my background fabric at 10 inches square which will allow for any trimming up after you applique your Dresden Plate. I like a nice clean edge when I sew my blocks together. Fold your background fabric in half and then in half again. Pinch and finger press the fold. This will give a centering mark to align your Dresden Plate.
 Align your Dresden Plate with 5 spokes in each quarter section of your 10" background square.
 Attach to the 10" background square with applique pins and baste the center hole.
 This is one of six blocks I'm making for a Valentine Table Runner for next year. I had good intentions but this month has gone by so quickly. After Christmas this holiday just sneaks up on you. I'm going to call it "Love Makes the World Go Round." The blocks with be surrounded with a checkerboard pattern using 1" (finished) blocks. It looks really cute in my head and when I get it done I will try to remember to blog about it.
 Here are some of the fabrics we bought at American Quilting on Valentine's Day. We are going to use civil war fabrics and fabrics that compliment them. The background fabrics are also shown. I'm not sure yet if I'm going to use just one background fabric or a variety of background fabrics. If you know me, you know I love all things scrappy so, I'll probably end up using several different background fabrics.

 Here's some of my civil war & shirting fabrics that I'm going to use in my big quilt. Maybe I'll make a king-size for my bed. We'll see if I get discouraged and just make a smaller one to hang over my couch or lay on my table.
Some of my friends and I are taking a Block of the Month Class at American Quilting and each year for the past 5 years Amy (the owner and resident designer) has designed and taught her Block of the Month Quilt. In past years we have done a Winter, Spring, Summer, and Fall Quilt and this year it's a Patriotic theme. The patterns for Amy's (past years) BOM Quilts can be purchased on her website "Under the Garden Moon" she also has more great patterns that she and her daughter have created. Make sure to check them out, you won't be sorry that you took the time to visit.
I'll keep you updated on our progress but, in the mean time I thought I'd get you all started with where to buy your ruler and a little tutorial to show you how to make the block. . . just in case you want to make a Dresden Plate Quilt along with us.
The ruler can be purchased from Connecting Threads or you can go into American Quilting and buy one if you live in or near Orem, Utah. The Dresden plate block as seen below was the BOM for January.
 This is the Dresden Plate Block.
The block will finish at 9 inches square when sewn into a quilt.
 This is the 18 degree fan ruler that also comes with a pattern.
Tutorial for Making a Dresden Plate Block
Next, you'll want to decide on a background fabric and purchase what you might need. You will get four 10"x10" squares out of every 10 inch cut of fabric (a generous 1/4 yd. cut).
 You'll need 20 rectangles for each Dresden Plate.
Each rectangle measures 2 1/4" x 3 3/4"
 Line up the ruler as shown above.
 Trim off both sides to create a wedge or spoke in a wheel. Take a single wedge, fold the wider edges with right sides together, and sew using a 1/4" seam making sure to leave a long tail in between the wedges (that way your stitches won't unravel). Now pick up another wedge repeating the process, continue chain-stitching until you've completed 20 wedges. Cut your chain apart. Trim the seam at the tip, press seam open and fold to the back (wrong sides to wrong sides). Center the seam and press.
 Here are all the spokes ready to be sewn into a Dresden Plate block.
 You can arrange the spokes in a pleasing manner or randomly pick them up. You can sew them into sets of pairs or sew them one by one like I did.
IMPORTANT: Make sure to leave long tails so they can be tucked under the seams in the back of the block. Continue sewing until you've sewn all 20 spokes together. Then sew the last seam to connect the wedges into a circle.
Please note: If you sew narrow (scant 1/4") seams you will end up with a bigger Dresden Plate. If you sew larger (fat 1/4") seams you will end up with a much smaller Dresden Plate. Which ever way you sew will determine how big of a center circle you will need to cover the opening and finish the block. Big or small be consistent!!
 The seams between each spoke can be pressed open or pressed in one direction. I personally liked the spokes pressed in one direction it gave it a sense of movement and dimension. The seams pressed open will make it lay very flat but it creates a depression in between the seams. Both will work it's just a matter of preference.
 Here's a look at the pressed seams in the back.
 My handy dandy pressing tool was very useful. It saved me a lot of trips to the ironing board and is very effective in pressing the seams open without any distortion.
 Here's the back of the completed Dresden Plate.
 Here's the front of the Dresden Plate.
 I cut my background fabric at 10 inches square which will allow for any trimming up after you applique your Dresden Plate. I like a nice clean edge when I sew my blocks together. Fold your background fabric in half and then in half again. Pinch and finger press the fold. This will give a centering mark to align your Dresden Plate.
 Align your Dresden Plate with 5 spokes in each quarter section of your 10" background square.
 Attach to the 10" background square with applique pins and baste the center hole.
 This is one of six blocks I'm making for a Valentine Table Runner for next year. I had good intentions but this month has gone by so quickly. After Christmas this holiday just sneaks up on you. I'm going to call it "Love Makes the World Go Round." The blocks with be surrounded with a checkerboard pattern using 1" (finished) blocks. It looks really cute in my head and when I get it done I will try to remember to blog about it.
 Here are some of the fabrics we bought at American Quilting on Valentine's Day. We are going to use civil war fabrics and fabrics that compliment them. The background fabrics are also shown. I'm not sure yet if I'm going to use just one background fabric or a variety of background fabrics. If you know me, you know I love all things scrappy so, I'll probably end up using several different background fabrics.
 Here's some of my civil war & shirting fabrics that I'm going to use in my big quilt. Maybe I'll make a king-size for my bed. We'll see if I get discouraged and just make a smaller one to hang over my couch or lay on my table.
Friday, February 13, 2009
Hugs & Kisses
Just a Little Bitty Valentine Greeting
from Me to You!
I hope your day is filled with lots of LOVE & JOY!
And maybe a little sewing thrown in, too!
from Me to You!
I hope your day is filled with lots of LOVE & JOY!
And maybe a little sewing thrown in, too!

I thought I would post another of my favorite quilts. Each year when I take out my seasonal quilts it's like opening a present to myself. I fall in love each time and wish I could keep them out all year long. This particular quilt I made several years ago and when I remembered having it I went down to my closet and found it. That was yesterday! LOL! I'm kinda sad I was too busy and too sick to remember it, but now I'll keep it out until February's over.
I thought I would share some of the details on how to make it. If you have any questions just let me know. You can put it on your list of things to make for next Valentine's day. I also have another Valentine project I'll share with you tomorrow. It's a work in progress and I won't be able to finish it before tomorrow, but it's going to be really cute for next year.
 This is my version of a Hugs & Kisses quilt that I designed.
Each block finishes at 6" x 6" with 2" sashings & 2" posts.
 The X's (kisses) are made using:
- four squares measuring 3 1/2" x 3 1/2" in red or pink.
- eight squares measuring 1 1/2" x 1 1/2" in Kona Cotton "Snow".
 The O's (hugs) are made using:
- 2 strips measuring 2 1/2" x 6 1/2" in red or pink.
- 2 squares measuring 2 1/2" x 2 1/2" in red or pink.
- 1 square measuring 2 1/2" x 2 1/2" in Kona Cotton Snow.

Thursday, February 5, 2009
Do You Like it?
I decided to stay home from work today and rest. I did get to sleep in but, I have to admit that I got up to sew a little bit too (just a bitty bit). I needed to work on my quilt for the quilt retreat I'm teaching at in a few weeks and also a few other neglected things, like laundry and dishes. I thought I might take a few pictures and blog a bit too!
I took pictures of one of my favorite red and white quilts that I made for Valentine's Day and wouldn't you know it but one of the pictures just screamed out blog header!!! I've been looking for a new blog header since I changed my background. I just knew it would make a pretty backdrop for my blog header so I opened up Photoshop Elements and played around with it. I hope you like it as much as I do. I just love red, white, and black. In fact, those three colors leak over to my wardrobe as well!!! I like lots of other colors too but, they're my favorite!!!
Here's some of the other pictures I took of my quilt. The original quilt was called Ohio Star and was done in yellow and white. It's made up of hourglass blocks, a small square and a larger square. Really cute and pretty simple to make.
 I love this quilt in red and white.
 The pattern can be found in this book called "101 Fabulous Rotary Cut Quilts" by Judy Hopkins and Nancy J. Martin printed by "That Patchwork Place" I need to make more quilts from this great book.
 Here's a picture of the quilt in yellow and white.
 I added a red outer border to my quilt.


 I thought I would throw in a few more of my favorite tools. This is my favorite custom fit thimble by Roxanne and you can go to their website by clicking here. The thimble has a nice fit and feel to it and it's a great thimble choice for those of you with nails.
Here's a little information from the website:
The RoxanneTM Thimble is available in sixteen sizes (2.5 thru 10) assures each quilter of a uniquely personal and snug fit. Ring sizers are available if you are unable to have us personally fit you or if you don't have access to a jewelry store. They are $3.75 per set. Please read our Fitting instructions before ordering. Roxanne's Thimbles come in three models:
 These are my favorite reading glasses that I use when I need to see my applique stitches. Old eyes can be a problem when it comes to handwork. I wear multi-focal toric lenses.
 This is another scrapbooking carry-all that I've converted to my sewing and applique needs. It's sturdy and easy to carry around.
 It has two heavy duty plastic trays that you can take out and set on your lap or nearby. You can also store your patterns in between the bottom of the tray and the black canvas.
 It stores everything you would need to have with you when you head off to your quilt classes. I love this handy dandy box.
I took pictures of one of my favorite red and white quilts that I made for Valentine's Day and wouldn't you know it but one of the pictures just screamed out blog header!!! I've been looking for a new blog header since I changed my background. I just knew it would make a pretty backdrop for my blog header so I opened up Photoshop Elements and played around with it. I hope you like it as much as I do. I just love red, white, and black. In fact, those three colors leak over to my wardrobe as well!!! I like lots of other colors too but, they're my favorite!!!
Here's some of the other pictures I took of my quilt. The original quilt was called Ohio Star and was done in yellow and white. It's made up of hourglass blocks, a small square and a larger square. Really cute and pretty simple to make.
 I love this quilt in red and white.
 The pattern can be found in this book called "101 Fabulous Rotary Cut Quilts" by Judy Hopkins and Nancy J. Martin printed by "That Patchwork Place" I need to make more quilts from this great book.
 Here's a picture of the quilt in yellow and white.
 I added a red outer border to my quilt.


 I thought I would throw in a few more of my favorite tools. This is my favorite custom fit thimble by Roxanne and you can go to their website by clicking here. The thimble has a nice fit and feel to it and it's a great thimble choice for those of you with nails.
Here's a little information from the website:
The RoxanneTM Thimble is available in sixteen sizes (2.5 thru 10) assures each quilter of a uniquely personal and snug fit. Ring sizers are available if you are unable to have us personally fit you or if you don't have access to a jewelry store. They are $3.75 per set. Please read our Fitting instructions before ordering. Roxanne's Thimbles come in three models:
- Gold or Silver Plated bronze
- Polished Bronze - good for quilters with metal allergies
- Solid Sterling Silver - our heirloom model
 These are my favorite reading glasses that I use when I need to see my applique stitches. Old eyes can be a problem when it comes to handwork. I wear multi-focal toric lenses.
 This is another scrapbooking carry-all that I've converted to my sewing and applique needs. It's sturdy and easy to carry around.
 It has two heavy duty plastic trays that you can take out and set on your lap or nearby. You can also store your patterns in between the bottom of the tray and the black canvas.
 It stores everything you would need to have with you when you head off to your quilt classes. I love this handy dandy box.
Wednesday, February 4, 2009
Sick!
Hi, Everyone! I haven't fallen off the face of the earth. I just got SICK!! I went to the doctor's today and I have a sinus infection. So, I'm taking my medicine and trying to feel better. I will try to post something this weekend. Hope you're all sewing!! Thanks again for all the LOVE I received from my giveaway!! I really appreciate it!! Lots and Lots!!
All the goodies have been mailed and should be arriving in mailboxes soon!
All the goodies have been mailed and should be arriving in mailboxes soon!
Sunday, February 1, 2009
The Winners Are?
First off, I want to take the time to THANK EVERYONE who visited my site this week. It was an eventful week and I had FUN staying up and visiting 100's and 100's and 100's and 100's of blogs. The most important thing I learned through this experience is the WEALTH of TALENT that is found ALL OVER the WORLD! Congratulations to everyone who participated. We are ALL Winners when it comes to sharing our talents. THANK YOU!!!!
I wanted to share a few statistics with you before I announce the winners.
I used microsoft excel to build a table and filled in all the important information like, name, blog, email, comment point, blogged about it points, friends mentioned your name points, and then I tallied up the points and assigned a number or a range of numbers if you had multiple points.
This is an example:
1 to 5
6 to 42
43
45
46
47
48 to 59
60
61
62 to 113
114 to 140
141
142
143 and so on. . . and so on all the way to 1,280.

P.S. I noticed the time that posted on this post and it's apparently not set for my time zone. Right now my clock says 10:26 a.m. Mountain Standard Time. I did wait for 10:00 a.m. before I posted the winners. : )
I wanted to share a few statistics with you before I announce the winners.
- I had over 454 comments.
- I had over 600 emails to read.
- I added over 45 new followers.
- The number of visitors on my site jumped from just under 10,000 to over 13,420.
- I had 1,280 entries from comments, bloggers who blogged about it, and friends that mentioned friends that blogged about it.
- I had quilters, knitters, scrapbookers, stampers, & crafters of every kind visit my blog.
- I had visitors from ALL over the World including USA, Australia, New Zealand, Samoa, Canada, Germany, Sweden, Hungary, Brazil, Argentina, Spain, Phillipines, and Holland, just to name a few.
- Congratulations came in a few different languages. Thanks to my husband who speaks & understands Spanish/Portugese for translating the many greetings sent from Spain, Brazil, & Argentina.
I used microsoft excel to build a table and filled in all the important information like, name, blog, email, comment point, blogged about it points, friends mentioned your name points, and then I tallied up the points and assigned a number or a range of numbers if you had multiple points.
This is an example:
1 to 5
6 to 42
43
45
46
47
48 to 59
60
61
62 to 113
114 to 140
141
142
143 and so on. . . and so on all the way to 1,280.
Then I generated a random number through random.org. . .
Let's hear the drum roll please. . .
The WINNERS of "The Spread the Love Giveaway"
are. . .
Let's hear the drum roll please. . .
The WINNERS of "The Spread the Love Giveaway"
are. . .
Random Integer Generator
Here are your random numbers:
41 970 Timestamp: 2009-02-01 16:50:05 UTC
and the names that go to the numbers above are. . .
the Suspense is killing me here. . .
Scroll down a bit more. . .

Shari from
mumsyblossomsworld
wins the Mini Purse with the Mini Charm Pack
and

Pam
(no blog) from (I don't know) wins the Love Note Pillow.
Congratulations to both of you for winning my 100th post giveaway. I will be emailing both of you shortly to let you know and to get your home address so I can get it mailed to you tomorrow!
One last surprise prize. . .
Goes to the person with the most friends who left a comment and mentioned that their friend sent them here. The winner is. . .
Nancy from patchworkpenguin
You will recieve a Mini Valentine Purse filled with Valentine treats. Sorry, there's no fabric but you do get the purse filled with chocolate!!!
Again, Thank you to everyone for participating in my 100th Blog Giveaway!!!
It was definitely a SUCCESS!!
I'm so HAPPY!!
P.S. I noticed the time that posted on this post and it's apparently not set for my time zone. Right now my clock says 10:26 a.m. Mountain Standard Time. I did wait for 10:00 a.m. before I posted the winners. : )
Subscribe to:
Posts (Atom)