Thursday, January 22, 2009

Plastic Boxes & Containers

I have an obsession with plastic boxes and containers.

Must BUY MORE!!! I NEED MORE. . . plastic boxes!!!

My husband gives me a hard time every time I come home with them (IF?, that's right! IF, he sees them, ha ha!). These sweet little boxes were EASY to get in the house and they work for so many little things you find in your sewing/crafting room! I bought them at TAP Plastic when I was visiting friends in California this past August. There are lots of little treasures on their website. I've mentioned just a few below.

I've used these 3 boxes to keep my snaps & tools in.

I googled their company for you and sure enough they have a website and you can buy them here. I was excited about that because I need a few more. LOL! These might be harder to sneak in since DH works at home and they would be delivered to our home. LOL! Anyway, here they are.

Several sizes to choose from:
B. Style FT-2: 0.76"L x 0.62"W x 1.69"H
C. Style FT-19: 1.60"L x 1.39"W x 2.53"H
D. Style FT-42: 2.13"L x 2.13"W x 2.63"H
E. Style FT-38: 3.70"L x 2.73"W x 1.16"H (good size, I need more of these)
F. Style FT-33: 2.72"L x 2.72"W x 1.34"H
(good size, I need more of these)
G. Style FT-104: 4.02"L x 1.51"W x 4.63"H
Style FT-4: 1.13"L x 0.69"W x 1.65"H (not shown)
Style FT-9: 1.60"L x 0.69"W x 2.53"H (not shown)

LOOK. . . at these Candy Bins?! What cute gifts they would make! I might have to add these to my order for Valentine's Day!

The boxes below I bought at a place here in Utah called "Xpedex" located in Orem. You can buy the bigger ones for under $3.00 and most places sell them for over $5.00. Hence, I have about 15 or more of them. You giggle and ask why? Well, it's because I have so many projects and projects waiting to be placed in a box. **smiles half ashamedly** Anyway, they are great boxes to carry and organize your projects in.

These plastic boxes fit 12"x12" scrapbook paper and are perfect for organizing my quilting projects. I have 10 of them stacked under my sewing table and a more can be found in a few other places. They also come in an 8 1/2" x 11" size.

These great plastic trays I got from Bed Bath & Beyond. I keep them by the side of my sewing machine and it holds all of the things I use frequently like my scissors, thread, bobbins, needles, presser feet, seam ripper, and a scratch pad for notes, etc.

I have lots of other plastic containers and plastic drawers full of stamps, paper, scrapbooking stuff and of course, fabric.

Hope you enjoyed this plastickie post.

Wednesday, January 21, 2009

Organized Chaos!

Do you like to organize? I do, but I often feel like I live in CHAOS too.

I have affectionately called it ORGANIZED CHAOS!!!

You may ask. . .What does that mean?

Well, let me explain. . .

I love to organize but have too much fabric, too many tools, too much paper, too many stamps, and NOT ENOUGH ROOM or space to put it all in. I need one of those really cool craft rooms that I've seen around blogland. I'm not saying mine isn't cool, I'm just happy to have a space to call my own. It's a spare bedroom with an inadequate size closet crammed full of stuff that's not easy to get too when I want something. Hence, the chaos occurs when I start digging to find something I know I have. Do you have the same problem?

I've been an artist/crafter/painter/scrapbooker/stamper/seamtress and quilter for 30+ years (basically all my life). So I have a lot of stuff I don't want to part with. Anyway, I'm rambling. My point is. . . I wanted to share some of my organizational efforts.


This is a great idea to utilize the space behind a door. I use it for my quilting and sewing things along with some of my scrapbooking and cardmaking things.

I forgot to mention it's a cheap over the door hanging shoe holder. Just in case you were wondering.

Sunday, January 18, 2009

Love Notes Tutorial

Well, here it is, as promised! I'm really sorry it's taken me so long but, I like to take detailed pictures for my tutorials and therefore it takes me a bit of time to orchestrate and finish. I hope you enjoy my efforts!

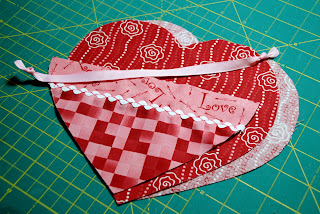
Love Note Pillow
by Kimbery Walus

Just a few details before you begin. The heart can be made into any size you choose. The one pictured is 8 inches across at it's widest point and 6 inches from the "V" at the top of the heart to the point at the bottom. I just took a regular 8 1/2" x 11" piece of white paper and folded it in half lengthwise. Then I just cut out a heart. You can make your heart long and slender or shorter and wider. The process will remain the same just the measurements will be different.

I've also included hearts I made for each one of my kids out of decorator fabrics. The pillows work just like a "Valentine Card Mailbox" and can be hung on a chair, a doorknob, a bedpost, or tied to your stair banister. You will also see a Valentine Card I made today to show you how it works. Just stick your "Love Notes" in the pocket of the heart pillow. The smaller hearts I made for friends and family.

My Valentine "Love Note" slips into the pocket of the pillow.

Here's a closer look!

Here's what you'll need to make the Love Note Pillow.
  • Cut 2 hearts out of a red fabric.
  • Cut 1 piece of fabric for for the pocket (it's approximately 3 inches up from point of heart).
  • Cut 1 pocket border strip @ 2 1/2" by width of heart (cut just a little bigger and trim excess after sewing it on the pocket making sure to follow the curve of the heart).
  • Cut One 12" piece of grosgrain ribbon to hang the pillow.
  • Cut One 9" piece of white Ric-Rac (or more if you make your pillow bigger).
  • 3 Strands of Pink or Red Embroidery Floss to sew on the Ric-Rac.
Make sure to sew on the pocket to the right side of one of the hearts. Secure top edges of the pocket by back tacking. Tie knots in the ribbon and back tack in place.

Make sure the ribbon is evenly spaced before continuing.

With right sides together put the two hearts together.

Using a 1/4" seam allowance sew around the heart starting just before the point and finish leaving enough room to turn right side out. A three finger measurement should be ample. Also, make sure to sew over the ribbons a back and forth to give it extra strength. The same goes for the edges of the pocket.

Before turning the pillow right side out make sure to clip your points and curves then turn and press the heart.

Lightly stuff the heart making sure not to over-stuff. You'll want enough give in the pocket area to put a "Love Note" and a Valentine treat or two inside for that special someone.

Here are a few pictures of the larger ones I made for my family. I used decorator fabric, tassels, cording, braided trim, ribbons, and a metal scrapbook buckle (by Creating Memories) at the center of the bows.


I've hung two of the pillows on the sconces in my dining room. They look really cute there and I may have to leave them there permanently. My husband didn't seem to mind having them hang there. He's become more of a neat freak as he's gotten older too so extra clutter doesn't stay around very long. We finally got the last of the Christmas things put away after work on Friday. It felt so good to have it done and that's why I had all day to work on this tutorial. I enjoyed sewing, organizing, making Valentine Cards, and working on a few other projects, too!!!

Have a great Sunday and holiday on Monday. I'm hoping to sew on Monday too!!!

Saturday, January 17, 2009

It's Coming!!!

As you can see from my self portrait, I'm feeling a lot better. I took this picture last Sunday before Church. I just held up the camera and took a few pictures to show you that I'm still alive and sewing.

I've been busy ALL day working on multiple quilt projects (for 9 hours) and taking pictures for the tutorial of my little peekie project from the last post. I know you've all been dying to see it. Right? Well, it's coming...soon!

Probably late tonight or tomorrow sometime. I have to run to a play tonight with the kiddos at 7pm and right now I'm running to American Quilting in Orem to get some fabric for a quilt I'm teaching at their Annual RETREAT the end of February. The quilt is looking really cute!!! I can't show it until after the retreat but maybe I'll give you a peek at the fabric I'm using. I'm also making the BIG surprise GIFT for all the ladies attending the retreat. Sorry, I can't show that either. Keep checking back!!

Thursday, January 8, 2009

Wiped Out!

I'm totally wiped out (no pictures of me cause it might shock you). I just wanted to let you know that I won't be able to manage much of anything until the weekend. It's been a rough few days at school with the little guy I shadow in 2nd grade. Everyday I come home exhausted from his multiple tantrums. I've lost my gumption to sew but I haven't lost my desire so that's the frustrating part. I have DESIRE but not the ENERGY!!! Please be patient with me and I'll try to get something posted in the next few days. I'll have to post a lot and then post date them so they come up during the week when I'm exhausted. Thanks for your understanding! Have fun sewing because I love being a part of it!!! It's kinda like reading a great book! You feel part of the story and that's how I feel about your sewing. I feel like I'm sewing right along with you and it's a lot of fun! So keep it up!

Just a little peekie at one of my projects . . .

Sunday, January 4, 2009

Horses & Fainting Goats

I thought you might enjoy this post I made on my family blog. Tracy is who I made the quilt "Kisses for Cade" Quilt for and you can see it here.

Yesterday, we went out to visit Tracy, Kenna's Horse Teacher at the Barn where she works. It's a lot of fun and this time we took Mark with us. We got to help Tracy finish feeding the horses and then we went to visit the new tennants. They have four fainting goats. It's called Myotonia Congenita and you can read about it here if you're interested. It was so funny to watch them. I don't think I've ever seen anything like it. So, I looked it up on google and found this fun video on YOU TUBE for you to watch.


I've also included some pictures that I took yesterday and the time Kenna and I went out there about a month ago. We really had a good time and Mark got to ride on Tash too!

Tracy and Kenna holding Tash (he's an Arabian).

Tracy is one SPECIAL Lady! We Love her!

Tracy caught the baby goat who is just a few weeks old. Look at the Momma goat looking a bit concerned. She would stand close and bleat to make sure her baby was okay.

This horses name is Handsome. He's a National Jumping Champion. He's also very tall even though you don't get a very good feel for his height in this picture and he's over 18 hands high.

Tracy is around 5 ft. tall.

Kenna got to hold the baby goat.

Momma Goat and Baby Goat.

Here we are posing by the hay we were giving to each horse.

Kenna & her brother, Mark.

You should have seen Kenna get all nervous when her brother got to ride on the horse. She wasn't so sure that he would be okay. She wondered if he could even ride a horse. But, he assured her that he'd be okay and that he'd been on a horse a few times in his life (scout trips).

Thursday, January 1, 2009

Happy New Year!

A Happy New Year's Wish from My Family to Yours!
Thank you for this past year of wonderful blogging!
You have each inspired me and made me smile!
I've loved every minute I've had to blog with you!

It's been a blast and I look forward to sharing
our time and our talents with each other in 2009.

May You and Yours Enjoy Peace, Joy, and Prosperity
even with the CHALLENGES we face each day and
May the Lord's Blessings Always Rest Upon You!

With Gratitude, Kim