Wednesday, December 22, 2010

50th Birthday & Moda Giveaway!


Well, the time has finally come to. . .

CELEBRATE my 50th Birthday

And what better way to celebrate than to have a. . .

GIVEAWAY!!!

I will be giving away quite a few things, so scroll on down, have a look see, and enter the giveaway.

PRIZE ONE:
Here's the first thing that I will be giving away. It's a Handmade By Me Sewing/Makeup Bag with matching tissue holder, sewing scissors, and matching pins. This is my newest favorite fabric, too! I made 12 of these bags for several of my sewing friends and while I was at it I made sure to keep one for this giveaway.


Prize TWO:
In addition to the sewing bag I will be giving away ONE Layer Cake of Fruitcake by Basic Grey in celebration of my newest Moda Bake Shop Project which you can see HERE.


PRIZE THREE:
I'm also giving away 4 tissue holders to 4 lucky winners.

Tutorial for tissue holders is located HERE.

It's Christmas time so, I'm going to keep it simple...

Enter Giveaway up to 4 times by doing the following:
  • Leave a comment on this post for one chance to win.
  • Post about the Giveaway on your blog then come back and leave me another comment for another chance to win.
  • Be or become a follower then leave me another comment for another chance to win.
  • Jump over to the Bakeshop and leave me another comment for another chance to win.
  • I will pick 6 names and the first two names will have a choice of the two top prizes and the other four names will win the 4 tissue holders.
The deadline for entering this giveaway
is January 1st 2011.

Tuesday, December 21, 2010

Quick & Easy Tissue Holder Tutorial


This quick and easy tutorial makes 6 Kleenex Tissue Holders out of a small amount of three different fabrics. I love making these for friends and neighbors as little thank you gifts or to add to a bigger gift. I have one in my purse and one in my church bag.

What You Will Need:
  • 7" of fabric for outside of tissue holder
  • 7" of fabric for inside of tissue holder
  • 6" of fabric for binding on tissue holder
Cutting Instructions:
  • Cut one strip of outside fabric measuring 6" x width of fabric
  • Cut one strip of inside fabric measuring 6" x width of fabric
  • Cut two strips of binding fabric measuring 2 1/2" x width of fabric


Sub-Cutting Instructions:
  • Sub-cut outside fabric into 6 rectangles measuring 6" x 6 1/2"
  • Sub-cut inside fabric into 6 rectangles measuring 6" x 6 1/2"
  • Sub-cut binding fabric into 12 rectangles measuring 2 1/2" x 6"


Sewing Instructions:

1. Take one inside fabric and one outside fabric measuring 6" x 6 1/2" and place them with the wrong sides together.
2. Repeat process for the remaining 6" x 6 1/2" rectangles making a total of 6 sets.
3. Take the twelve 2 1/2" x 6" strips fold in half and press with wrong sides together.
4. Using a 3/8" seam allowance sew two binding strips with one on each 6" side of the tissue holder.


5. Press binding fabric outward on both sides of tissue holder.


6. Fold the binding up and over to the back of each tissue holder and stitch in the ditch.


7. Repeat on the opposite sides of each tissue holder.


8. Fold tissue holder in half with the right sides together.
9. Press the corners. This is the center.


10. Fold binding edges into the pressed center mark and pin in place. Make sure the outside fabric is in the inside as seen in the picture below.


11. Using a 1/4" seam allowance sew both sides of the Tissue Holder closed. I like to backstitch at the beginning, the end, and over the opening to make sure it's really secure.

12. Finish the inside seams with a serger. If you don't have a serger that's okay. Just use a zigzag stitch on your sewing machine.


13. Turn the tissue holders right side out making sure to push out the corners.
14. Press the tissue holders and you are done!

Kleenex Tissue Holders
~1 for you and 5 friends~

Monday, December 20, 2010

Can You Believe it?


It's my 50th Birthday today and it's been so crazy that I didn't even get to make the post I had planned, but, I have something big coming on the 22nd so be sure to check back in a couple days.

Remember my daughter who went to New Zealand for 4months? Well, she flew in late this afternoon and we picked her up at the airport and then went out to dinner at the Outback Restaurant. What a perfect birthday. I had every one of my kids together after four long months of separation. I sure missed my daughter.

Hope you're enjoying your holiday preparations.

Friday, November 26, 2010

Blessings Banner

Today, I am especially mindful of the abundant blessings I have in my life and the wonderful friends and family that have shared their lives with me. I want to thank my blogging friends, too. I really appreciate the time you take out of your busy lives to visit me here on my blog and for all of the kind words you leave in my comment box. Your comments are always appreciated.

Here's a little something I made yesterday. . . It's a Thanksgiving BANNER.

On Thanksgiving morning I woke up really early and all was quiet around the house. . . So. . . I quietly tiptoed downstairs to my sewing room hoping no one would find me for a few hours so I could focus on a few projects.

I was thinking, "What should I be working on today? I only have a short window of time before the final preparations begin. So, I better decide now and get working."


Well, as I was sitting there thinking I got side tracked from my multiple existing projects and decided to start a new project that's been brewing in the back of my head.

Here's the argument that went on in my head . . .

First off, I thought, "You've got to be crazy starting something new."

Then I thought,

"I can whip this out, it won't take long."

"You really need to do this, it's going to be really cute."


"But, I don't have time. . ."

"You can do this. . . you know you want to."


So, I got out my measuring tape and measured the mantel over my fire place and then pulled out my civil war prints and started picking out some of my favorite fabrics.


I decided on the word "Blessings" and figured out the math. You should've seen the frenzy. It's really satisfying for me to create something in my head and then create it. It's really a bonus to see that what you've made matches the vision in your head. It took me a total of 2.5 hours from thought to finish.


I will be posting a tutorial for this banner and the other one's I have floating around in my head sometime in the New Year. I will definitely let you know when I post it.

Wednesday, November 3, 2010

Halloween Apron Finish

I finished my apron a week before Halloween and it was so fun to wear at school. What an easy costume and so comfortable to wear. I really like this pattern and blogged about it HERE. If you go to this post you will find the information about the pattern and the apron bib which I changed. This particular apron bib is a 9" spider web block with a 1" finished border all around the block.

To make my apron I used Riley Blake's "Boo to You" collection by Mind's Eye for Riley Blake. You can see the whole fabric line HERE on Riley Blake's Website. If you hurry you may still be able to find some of this fabric online. It will probably be on sale too. I found some of it HERE and HERE and HERE. You may still be able to find some in your Local Quilt Shops too.

I almost forgot. I also used a Moda Bella Solid Black in the block and the border around the block too .


This apron is reversible which I really like.
Can you see the back fabric of the skirt?


Here's a closer look.


The day before Halloween my friend Candice (at work) wore this black spider ring made out of black beads. I had been looking for a spider and thinking about maybe having to make one when my eye saw this spider on Candice's hand. It was the perfect size and look that I wanted.


At lunchtime, I ran to the store where she got it and bought two of the last 3 spider's they had left. She thought they were gone and we started looking. I was so excited when we found a few hiding amongst the Halloween fare. The spider was the perfect finishing touch and the other spider ring I wore on my hand. So cool!!!

I hope you all had a great time giving out or collecting candy!!!

Tuesday, November 2, 2010

Costume Wrap Up

I finished Kenna's costume just in time for her Class Party. It took a lot longer to make than I projected because I got such a late start in the day. I finally sat down at my sewing machine at 10:30pm. I was already tired so I wasn't sewing very fast because I didn't want to have to unpick anything. I still made a mistake that didn't look like a mistake until it was finished and I thought "Oh Well, I don't even care. It's okay and no one will notice." and they didn't. I fell into bed at 3:30am and got up at 7:00am to get ready for work. It was a crazy night. I felt like a Zombie (Hi Monica!) the next day. lol.

Anyway, I'm just happy to mark that one off my list.

My current "To Do List" is quite LONG but, I'm ALWAYS juggling things around to suit my needs and to help others when called upon. But you know, I like it that way....


My sweet Dorothy from the Wizard of Oz.


What kid doesn't like donuts?


Hip Ruby Slippers.

Because Kenna wears a women's size 8 we couldn't find any sparkly glittery ruby slippers plus there was no time to make them nor did I want to deal with the mess so, we decided to buy cute red converse shoes that she could wear afterwards. They looked really cute on her.

Thursday, October 28, 2010

It's Called Procrastination

This is what I will be working on later today when I get home from work. There's nothing that causes more stress than Procrastination. lol. I was going to work on it yesterday but I was out buying a costume for Achievement days yesterday since I hadn't made Kenna's costume yet. lol. Oh well, I can only do what I can do and I have to be okay with that or I'll drive myself crazy. I have too many pots on the stove at one time.

I'm hoping someone understands my wonderful life. By the way...I'm NEVER BORED and I like it that way.


I will show pictures when I finish. Oh, I did get my halloween costume done. lol. I will take pictures of it later. I knew that if I didn't finish mine it probably wouldn't happen. I can deal with one last minute halloween costume but not two.

Have a great day!!! I better dry my hair and get to work.

Wednesday, October 27, 2010

And Snow it Goes...

Well, this morning brought us a great big surprise in the form of SNOW!!!! I like snow but, I wasn't quite ready for it. . . mentally. . . anyway.

Heck. Just yesterday it was summer and fall seemed like such a small blip on the screen.

So, I thought it would be fun to share the pictures I took today.

This is the scene I saw when I opened the garage to leave for work this morning.

I love this snow covered look. So beautiful and serene.


My flowerless pots.
I miss the flowers already.


Today's Snow Related Humor:
Before the kids went outside for recess the teacher gave the kids a few SNOW instructions.
  1. No throwing snowballs at the building.
  2. No throwing snowballs at each other.
  3. No throwing snowballs at anything.
  4. And. . . make sure not to get too wet.
The kids all ran out with excitement! Ready to play, play, play.

I had my camera today so I snapped a few pictures as I watched the kids enjoy the first snowfall of the season. What a great recess!!! The teacher even gave us 10 extra minutes.

The girls in my class were really funny pushing around these huge snow balls and Mr. O (the teacher) who has a very dry sense of humor asked them if they planned on throwing it.

The girls responded with. . . huh?

I giggled. . . refer to rules #1, #2, #3.


Look at the huge snowball they made.


Can I get some help here?


Everyone PUSH!!!


They managed to get a just slightly smaller snowball on top of the huge snowball and then made a smaller one for the head of their snowman.


They finished him off with eyes, small stick arms, and a smile.


They also made a small friend to keep him company.


The boys got in on the snowball action too.
I'm happy to report that NO throwing of snowballs occurred during recess.
Mr. O was very happy!


All pictures have been creatively cropped and faces have been distorted to protect the kids.

Sunday, October 24, 2010

Apple Pie Goodie

Fall is officially here and it's feeling like winter is not too far around the corner. The leaves have been changing, the weather has been wet, the temperature is falling and we even saw snow on the mountaintops. I can't believe it's finally here. Yeah! I absolutely LOVE the COLD weather!

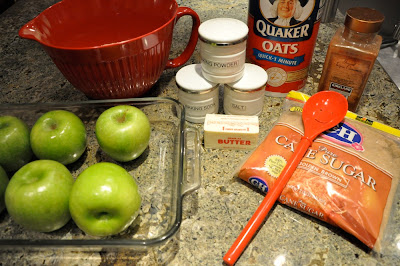
So to celebrate the changing of the seasons I'm going to share one of our family's favorite desserts called Apple Pie Goodie. It's been a while since I last made it but, today was the perfect day to make this warm, gooey, tasty, and yummylicious dessert.

So Let's Get Started. . .


Apple Pie Goodie
Preheat your oven to 375 degrees.
  • 5-6 Large Granny Smith Apples (peeled, cut, and sliced)
  • 1 cup Sugar
  • 1/2 tsp. Cinnamon
  • 1/4 tsp. Salt
  • 2 tbsp. Flour
Place the peeled, cut, and sliced apples in a 9" x 13" pan.
Mix dry ingredients then pour over apples.
Stir to make sure apples are evenly covered.
Set aside.


Apple Topping
  • 3/4 cup Brown Sugar
  • 3/4 cup Quick Oats
  • 3/4 cup Flour
  • 1/4 tsp. Salt
  • 1/4 tsp. Baking Soda
  • 1/4 tsp. Baking Powder
  • 1 Stick Melted Butter
Mix the dry ingredients for topping.
Set aside.

Melt butter and pour over dry ingredients.

Mix well.

Crumble topping over the sliced apples.

Bake at 375 degrees for 45 minutes.
Let cool for 5-10 minutes, if you can wait that long. lol.
Just be careful not to burn your tongue.

Serve with ice cream.
Enjoy!

Look who wanted to get in on the action. . . My grandson, Benjamin.
He really wanted to help and told me how much he loved this "gooey" dessert!

Grandkids are the APPLE of my EYE!!!

Monday, October 18, 2010

Tini Treat Bags

Over the weekend I started the "Tini Treat Bags" that were designed by Monica Solorio-Snow from Happy Zombieland. You can find the pattern HERE.

I'm making these bags for some of my friends at work who have October birthdays and for some friends from church that I visit teach. I thought it would be fun to fill them up and spread some Halloween Cheer.

I've managed to cut out 12 bags and I've completed 5 bags with 7 bags to go. All 12 have been sewn together. I just have to sew the 4 corners and turn the bags right side out and then press them. It shouldn't take me more than an hour, I'm hoping anyway.

Finished Bag Size: 4" x 4" x 2"


This is another one of Monica's patterns that she did last year called "The Poochie Bag" and this is the LINK for the larger version. The smaller version (as seen in the picture above) is called "The Itty Bitty Poochie Bag" and you'll find it on the Moda Bakeshop HERE.

If you love bags here's a BAG that I designed for the Moda Bakeshop. It's big enough to hold a few charm packs or fat quarters and any other little goodies you may want to give to a friend for a birthday or special occasion. I love making, designing and giving little things to friends.

These are the 7 Tini Treat Bags that I have yet to complete.

After I finish the bags I will be starting on Kenna's Halloween Costume and working on the binding for my "Sneek Peak" quilt that I just picked up.