I will have to make a few pincushions out of other fabrics to inspire you.


Here's a picture of what you'll need.

Cut your piece of fabric to measure 4.5"x9.5"
Fold the short ends (5") together.
Sew right sides together using a 1/4" seam allowance.
Thread needle and knot one end.
Measure down a 1/4" and sew a running stitch around one raw edge of the fabric.

Wrap the thread around the gathered fabric.
Secure the thread, tie a knot, and cut the end of the thread.
This will become the top of your pincushion.
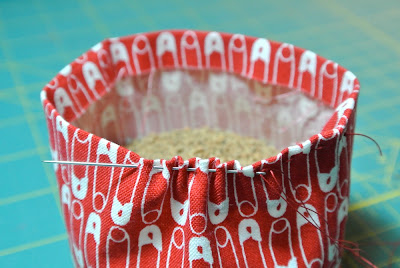
Here's a view looking in.
Sew another running stitch close to the top edge of fold line.
Pour in a generous 1/2 cup of crushed walnut shells.
Pull running stitch tight.
This is the point that you will make any adjustments to how full and
how tight you want your pincushion.
You don't want it too tight because you need to mold it to fit into your bowl.
Just take out or add to it before you sew up the end.
Sew opening closed by criss crossing the thread from side to side across the pincushion.
Secure thread, knot, and cut off the end of the thread.
Thread a long needle matching ends of thread.
Insert needle at bottom of pincushion pushing through to the top.
Then thread through one side of a two hole button and then through the other side of button and down again into the pincushion and out through the bottom of the pincushion.
Tie 2-3 knots in your crochet thread then cut tails within about an inch of knots. You may place a bit of glue on the knot to keep it secured. Do not cinch your thread too tightly as you will want a bit of give when you smush it in your bitty little bowl.
Don't they look cute together?
Click HERE to go to the
Bitty Bowl of Pins Tutorial Part 1- Supply List
Click HERE to go to the
Bitty Bowl of Pins Tutorial Part 3 & 4-
Stamping the Metal and Finishing the Bitty Bowl of Pins
Coming Soon!


7 comments:
Great tutorial Kim. Thanks for doing this. I do have a piece of the red safety pins in my stash...
Mary
that's lovely...thank you for sharing the idea
Great idea thanks for the tutorial! I will try it.
Looking very cute Ms. Bitty Bit!
Un blog maravilloso.
Besos desde España
Oh how cute! What a super tutorial.
Thanks so much for showing us all how!
Have a wonderful week. Sincerely, Trish
Wow! These are so sweet! I can't WAIT to see how you make the metal stamping!
Post a Comment