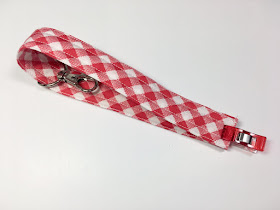
A few of my Instagram Friends saw a post I recently did on my Instagram account and several asked me for more information so I decided to put together a tutorial for my version of a Key Fob. It's been so very long since I've actually posted something on my blog but this is a great way to post tutorials for everyone to see and understand the steps and process in making things. I hope you enjoy this quick and easy tutorial. It's my GIFT to YOU this Christmas Season.
Key Keeper Supplies:
- Cut 1 piece of Pellon (One-sided) Fusible Flex Foam #FF78F1 measuring @ 3/4" x 12 1/2"
- Cut 1 piece of Fabric measuring 3" x 12 1/2"
- 1 Swivel Lobster Claw Clasp Size 1 5/8" x 1" D Ring (inner width is 3/4")
- Matching Thread for top stitching
- 10 Binding Clips
- Applique Glue
- Zipper Foot
Swivel Lobster Claw Clasp Size 1 5/8" x 1" D-Ring
(inner width of D-Ring measures @ 3/4")
Pellon (#FF78F1) One-Sided Fusible Flex Foam Scraps
Key Keeper Instructions:
1. Start off with the 3" x 12.5" fabric strip
and the 3/4" x 12.5" foam strip.
2. Turn on your iron to set to High or Cotton making sure the Steam option is on. Then FUSE the adhesive side of the foam to the wrong side of the fabric along the long bottom edge of the 3" strip of fabric.
3. Fold the top edge over a 1/4" and press the
fabric along the top edge.
4. Take the bottom foam edge (foam is facing up before folding) and fold it over toward the middle of the wrong side of the fabric making sure the foam is wrapped snug inside.
5. Bring up the top pressed edge and fold it down to meet the foam edge that you just folded over. The top pressed edge should match up with the folded foam edge (see above picture).
This will encase both raw edges inside.
6. Use the applique glue to adhere the two long edges together. Use the binding clips to keep it secure until the glue is dry.
7. The glue takes less than a 1 minute to dry then remove clips.
8. Sew a narrow stitch on each long edge of the Key Keeper.
9. Then sew a 1/4" on each long edge of the Key Keeper.
10. Slip the short end of the fabric strip through the
opening in the D-Ring (see picture above).
11. Place both short ends of the fabric together
and sew a 1/2" seam.
12. Turn the inside toward the outside so that the sewn ends remain on the inside of the circle. Open the seam and place the straight side of the D-Ring inside the opened seam.
13. Pull the fabric of the Key Keeper up and around the metal.
Then sew together using a 1/2" seam allowance.
14. Attach the zipper foot to your machine. Place your Key Keeper under the presser foot with the metal clasp located on the right of the zipper foot and the fabric loop on the opposite side of the zipper foot. Sew back and forth several times making sure to sew as closely as possible to the metal clasp to get a tight fit.
15. A 6" piece Ribbon can be added to the clasp if desired. Tie the ribbon on and trim the ends.
The Key Keeper can easily be attached to your keys and makes it a lot quicker when you're digging through your purse to find your keys. You can even slip the Key Keeper around your wrist when you're out shopping or just going to the mail box to get your mail. I even clip my keys to my purse or belt loop.
I also use the Key Keeper as a handy strap on many of the bags and pouches I like to make for myself and others. Pictured above is my modified version of the Easy Sew Cosmetic Bag by So Sew Easy. Just incase you are wondering, I just made my bag longer).
You can find the link for the Easy Sew Cosmetic Bag- click HERE.
I hope you find this tutorial useful. I've made over 200 of these Key Keepers over the last few years now and lots of friends tell me how much they love them and that's it's easier to keep track of them.
If you want to follow me on instagram I can be found. . .
@bittybitsandpieces
Just hit FOLLOW and I will get you connected.
Thanks for visiting my blog!!


