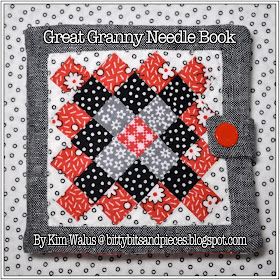
It's been so much fun seeing all of the blocks and finished quilts over at the
Great Granny Along
and I've been so inspired by everyone that I wanted to reduce the block and make a pincushion.
So today, I pushed off cleaning the house and made a itty bitty Great Granny Pincushion instead. It's much more fun creating than cleaning. I'm just putting off the inevitable and will need to get some cleaning done before I go back to work in a couple weeks.
Anyway, I started thinking that maybe all of you would like to make a pincushion too. . .
So. . .
I put together a little tutorial on how to make your very own Great Granny Pincushion.
First off, the directions for making the block are exactly the same directions I used to make my miniature block. Go check out Lori Holt's Tutorial
HERE. The only difference in the blocks is the size of the squares and the rectangles. I also added the instructions for putting together the pincushion.
Not only can you make a pincushion but, you could also make:
- More blocks and make a small doll quilt (I'm thinking I need to make a doll quilt too).
- Make the block into a Mug Rug to use by your sewing machine or on your cutting table.
- Frame the block and hang it in your sewing or craft room.
So, enough talking and on to the Tutorial. Here it is. . .
NEWS FLASH!!!
I had a great epiphany early this morning that I wanted to share with you!
I'm sure many of you collect CHARM PACKS. . . Am I right?
Well, I realized this morning that you could also just use 4 charm squares from any Charm Pack to make the pincushion! When I did the math in my head I realized that you can get SIXTEEN (16) 1 1/4 inch squares out of each 5 inch Charm Square. Isn't that cool? Just another way to use all of those amazing Charm Packs you have laying around. Although, I do find it hard to open them up and actually use them. lol.
The Great Granny Pincushion
Finished Size: 5x5 inches
Pincushion Supply List:
- Four different prints for the block
- White Fabric for the block background
- 5" x 5" Acrylic Ruler (Similar to the "Dear Jane" Ruler)
- Pincushion Filler (I used crushed Walnut Shell)
- Thread
- Buttons
Cutting List:
Out of Multi-Colored Fabric:
- Cut 1 Square @ 1.25 x 1.25" for Baby Center
- Cut 4 Squares @ 1.25 x 1.25" for Mama Round
- Cut 8 Squares @ 1.25 x 1.25" for Granny Round
- Cut 12 Squares @ 1.25 x 1.25" for Great Granny Round
- Cut 2 Squares @ 5" x 5" for Pincushion Back
- Cut 1 Strip @ 1.25" x width of Fabric for Binding
Out of White Fabric:
- Cut 12 Rectangles @ 1.25" x 2" for end of rows
- Cut 4 Rectangles @ 1.25" x 2 1/4" for the corners
- Cut 1 Square @ 5" x 5" for Pincushion Lining
Instructions:
1. Make one Great Granny Block following these
instructions.
2. Use a 5"x5" ruler similar to the "Dear Jane" ruler you see in the picture below.
3. Center the Ruler and trim off the excess.
4. Take the two 5" squares for the pincushion back and press one square in half.
5. Place right sides together with the pressed square on top.
6. Sew along the pressed line leaving a 1.5" gap then continue sewing to the opposite edge. Make sure to back tack where you stop and start the sewing.
7. Now fold the wrong sides toward each other to reveal the right sides of fabric.
8. The place where you didn't sew becomes the opening where you will fill the pincushion with the crushed walnut shells. Use a funnel to fill it up.
9. Now take the block, the white lining, and the backing. Then stack one square on top of the other.
10. Pin the layers in place.
11. Take the 1.25" inch strip and sew a single binding around the four edges.
12. Turn over your quilt and fold the edges toward the raw edges of the block.
13. Now fold the folded edge up and over to the back of the block. Press.
14. Turn the block over to the front and stitch in the ditch along the edge of the binding making sure the underside is sewn in at the same time.
15. Fill the pincushion with crushed Walnut Shell, using a funnel, and fill to the desired density.
16. Place a small amount of batting inside opening to prevent filling from falling out, then stitch the opening closed.
17. Using heavy thread stitch a button to the center and pull tightly, then secure the thread and cut.
18. You're Great Granny Pincushion is done. Now, how about making another one for a friend?
I hope you've enjoyed this tutorial and if you have any questions feel free to send me an email. Remember, I love comments! So. . . feel free to leave as many comments as you like. It makes me feel good knowing that you like what I do. Yes...I'm fishing for compliments. lol.
Have a Great Day!!!


