Pages

Tuesday, July 24, 2012

My Fabric Box & GGA Quilt Finish

Hi Everyone!

I'm excited to share my finished Great Granny Quilt but, first I thought I'd share a tip with you and a new green block that I decided to re-do before I show you the quilt. Of course, I can't prevent you from being as excited as I am and scrolling down to have a look but, that's okay. Scroll away, just make sure and come back to read about my great fabric tip.

So, here's my collection of 2.5 inch squares that I started 5 or 6 years ago. I can never remember the exact day but, it's been a long time now since I made my box of fabric squares.


Anyway, when I first saw the Great Granny Along I immediately pulled out my box of squares. It was a great resource of already cut 2.5 x 2.5 inch squares and while I was working on the Great Granny Along I actually added more squares to my box every time I cut new fabric for my blocks.

Supplies for Fabric Box Collection of 2.5" Squares"
  • 12.5 inch Plastic Scrapbook Box
  • Cereal Box Cardboard (fabric dividers)
  • Variety of 2.5 x 2.5 inch square of fabric

Start Collecting 2.5 x 2.5 inch squares:
  • Whenever you buy fabric cut a 2.5 inch strip off and then subcut it into 16 squares.
  • Whenever you're cutting fabric for a quilt project just cut an extra 2.5 inch strip and then subcut it into 16 squares.
  • Whenever you have any leftover scraps just cut them into 2.5x 2.5 inch squares.
  • Whenever you have a minute add squares to your box and before you know it you will have quite a few 2.5 inch square ready to use for any project you're working on.


Here's the re-do on one of my Great Granny Blocks.


Here are a few pictures of my finished quilt!

I used Lori's instructions on cutting the sashings and the border. Go HERE for the tutorial.

Notice the squares in the sashings?


Well, I decided to add my own flare by hand appliqueing squares where the blocks intersect.
The applique squares are set on point to compliment the pattern.

Here's How I Made the Squares:
  • I used 16 squares measuring 2.5 x2.5 inches.
  • Starch one fabric square at a time.
  • Turn the fabric 1/4 inch on one side then press.
  • Turn the fabric 1/4 inch on the opposite side then press.
  • Repeat for the remaining two sides of the square.
  • I used Applique glue to secure the squares in place.
  • I then used matching threads to applique each square in place.


My husband helped me out by holding the quilt but the wind wasn't cooperating.
He's been on conference calls all morning so I had to make it quick.


The wind finally died down and I was able to catch a few pictures before his next meeting.


I'm really happy with how it turned out and can hardly wait for, my friend, Kaylene to quilt it!!!


If this quilt has inspired you, it's not too late to join the Great Granny Along. Go HERE to read more about it and her links will direct you where to go to sign up.

Saturday, July 21, 2012

Saturday Projects-Blog Button

Here's my new Blog Button. It's been a long time coming but I finally found something that I'm proud of and willing to use to advertise my blog.

I'm still trying to figure out the html stuff and I can't get my picture to come up so I'm going about it another way. I've read a few blog posts about creating buttons but it's just not my expertise. So, I will continue to fumble in the dark and have a stab at it.

Wish me luck!

Here's my blog button and when you see it on the sidebar of my blog that mean's I succeeded! lol.

Update: I think I did it. You'll see my button on the sidebar! Yippee! I used this blog tutorial that really helped me out. Thanks to Somewhat Simple's Blog Post called Blogging 101-How to Make a Button

2nd Update: I got the dang button to work but it doesn't seem to link back to my page. HELP!!! If you can help me out then just give me a holler! I've followed the directions repeatedly to make sure I got it right. It looks right but doesn't want to link. I tested it on my family blog and it shows up just fine but doesn't link over. I finally resorted to adding a picture gadget and then adding the link.


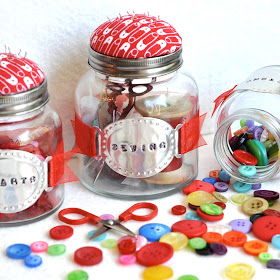
I've been inspired by all of the Pincushion Jar's on Pinterest and when I found these jars at Hobby Lobby I knew I had to have them. They are the cutest shape and came in 4 sizes. I pick 3 of the 4 different sizes and took them home with me.


The metal tag I made using my dies and art metal. You can find a link to my blog post about how to do it and where to get the stuff you need to do it HERE. You can link to all four parts of the tutorial from there.


The biggest jar in the center is my little sewing kit jar and the smallest jar holds a few of my buttons. The medium jar holds my collection of HEART buttons.


Aren't they just adorable together?


I hope you enjoyed this Saturday Projects Post!

What have you been creating today?

Sunday, July 15, 2012

Great Granny Along

If you can believe it. . . I've gone and joined a Sew Along!

I don't usually join Sew Alongs because I'm rather pathetic at it and I don't especially like feeling like a failure. Any of you know what I mean? It has to do with following through on things and if I can't follow through then, I try not to join any type of Block of the Months, Sew Alongs, or Block Exchanges, unless I know for sure that I have the time and can actually accomplish the task I've signed up for. I just don't like being a flaky flake! Time for the fun stuff can be very elusive!


Well, here are the details. . .

The Sew Along is called The Great Granny Along and it was started by two of my long time friends and bloggers, Lori of Bee in My Bonnet Co. and Jodi of Pleasant Home. I was sooo excited about the sew along that I practically ran to join the Flickr group.

I'm having such a great time that I would encourage you to go HERE and join. No pressure, just a lot of FUN and once you make ONE block I know you'll want to make another. . . and another!!! I've already made 7 and I have 2 more blocks cut out  and ready to sew.  That's 9 Blocks and that's enough blocks to finish a small quilt as seen in Lori's blog post.

It's fun! It's fast! It's easy! Go Sign UP NOW!!!


For a little inspiration. . . here are the blocks I've made so far. . .


Have FUN making Great Granny Blocks
and I look forward to seeing everyone's blocks in the Flickr Pool.

When I'm done I think I'll have to make some Red, Black, White, and Grey Blocks.

The Possibilities are ENDLESS!!!

Tuesday, July 10, 2012

Ribbon Flower Tutorial & Wedding Pictures

Life has been crazy around here since getting home from New Zealand and I still need to do a few vacation posts and show you pictures of our adventures along with pictures from two quilt shops that I was able to visit but in the meantime I have a tutorial for you. You can see the post I did HERE about making my daughter's bridal bouquet.


Supplies:
  • 1 yard 3/4" Chevron Twill Tape from Kari Me Away
  • 1 Decorative Button
  • Needle
  • Thread
  • Scissors
  • Small Ruler
  • 7 Straight Pins

Instructions:
1. Begin by cutting 7 strips measuring 5" in length.


2. Align the ribbon next to your ruler and insert a pin at the 2 3/4" mark on the ruler.


3. Fold each end in toward the 2 3/4" measurement and secure with two pins.


4. Fold the shorter end toward the larger end and secure with a pin. Repeat this process for the remaining 6 ribbon strips. This will create the petals for the flower.


5. Thread needle with quilting thread (it's stronger) and knot the end. Insert the needle and using a running stitch go in and out twice. Refer to picture below.


6. Repeat this process for the remaining 6 ribbon petals. Stringing them onto the quilting thread one at a time as seen in the picture below.


7. To Connect the flowers insert the needle into the first ribbon where you started.


8. Pull thread to gather the petals. Continue to sew around the back of the flower stitching from petal to petal to secure the flower. Knot the end of your thread but don't cut it off. You will bring it to the front to sew on the button.


9. Turn the flower over and stitch on the button. Tie off the thread and cut the end.


Now that you've made a flower you may be asking what to do with it. Well, here are a few suggestions, you can sew it on a pin back to attach to any item like a purse, an apron, or a blouse. You can also glue the flower to a headband or hair clip. You can also do what I did and make a handmade bridal bouquet with all sorts of ribbon flowers.


Here are a few pictures of the happy couple and the bridal bouquet.